


Looking for a light, inexpensive, DIY alternative for boiling water while backpacking or camping? Have you bugged in without heat and power? Have you bugged out to find that your manufactured stove has broken? From the casual traveled to the hardcore prepper, the alcohol stove is a fun, handy, and ingenious little piece of technology to master, and one that can come in extremely helpful, from a tight situation to a major catastrophe. It performs well at colder temperatures or higher altitudes, an obstacle that plagues many commercial stoves.

By Joshua Valentine, a contributing author to Survival Cache and SHTFBlog
Do It Yourself Stove
The beer can alcohol stove burns in near silence, and can function as a primary stove or an excellent back up option should one’s primary stove fail. Its simplicity allows it an incredible reliability, with more or less a zero percent rate of failure, and it does not require specialized fuel canisters, as the alcohol it burns can be carried safely in something as simple as a plastic soda bottle.
There are countless different designs for alcohol stoves, but I find that this particular style rises quickly above the rest. It is cheap and easy to construct, taking only 5-10 minutes, and in all but extreme cases does not require an additional apparatus to support your pot or pan without extinguishing the flame. It can also hold a considerable amount of fuel compared to other designs, is extremely simple to fill up and extinguish, and allows the user to recover the unused fuel for later use.
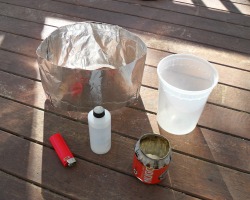
Materials:
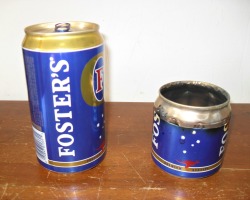
1 Beer or Soda Can: A standard 12oz can works just fine, though I most prefer the stout, 25.4oz Foster’s beer cans, sometimes called Oil Cans. Not only does the larger can grant one leeway with cuts and dimensions, but also allows for building a slightly deeper well to contain more fuel. The aluminum is a bit thicker, and thus studier, and the wider top allows more stability and balance when using larger pots or pans, which comes in handy if you are cooking meals rather than boiling water. For our demonstration, however, we will use a standard 16oz can, as they are more commonly known and found.
Knife, Scissors, or Leatherman Supertool: The entire stove can be created with just a knife, however it is most conveniently done with a Leatherman or other like super tool, as the scissors facilitate more clean and easy cuts.
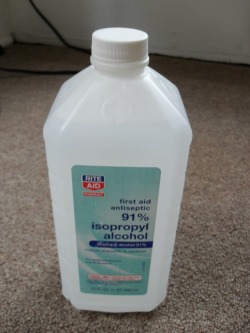
Fuel: This stove will work OK on 91% Isopropyl Rubbing Alcohol, but runs ideally off of 95% Grain Alcohol or 99% Denatured Alcohol for a cleaner, hotter burning stove. 91% Isopropyl can be found and purchased at most pharmacies for around $3-$5 for a 32oz bottle. In thirty-degree weather at sea level, it took upward of fifteen minutes to boil two cups of water on just under ½ cup or 120ml of fuel. The Isopropyl also leaves a thick, black soot residue when burned. Denatured alcohol can be found and purchased online or at most hardware stores for around $7-$10 for a 1qt can. In thirty-degree weather at sea level, it took about five minutes to boil two cups of water on ¼ cup, or 60ml of fuel. It leaves no residue or soot when burned, but burns with an invisible flame, requiring even more vigilance and attention.
Grain Alcohol, such as the 95% Everclear, is available at most liquor stores around $30 for 1.75L. In thirty-degree weather at sea level, it took about five and a half minutes to boil two cups of water on ¼ cup, or 60ml. It leaves no residue or soot when burned.
Combustion: Matches, a lighter, or any other source of flame is acceptable.
The Steps
Step 1: Remove the can’s top. Using your knife, carefully work the blade into the indented ring that runs around the drinking surface of the can. As you cut, work your way out from the indented ring until you are cutting right up against the outer ring. Take care not to dent, damage, or puncture the can. Take your time, and take care to cut safely away from yourself and others.
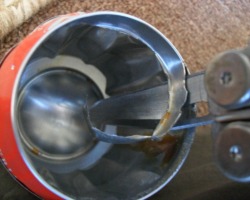
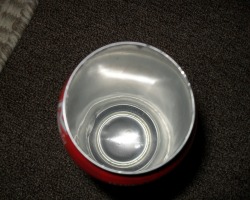
Once finished, the top should fall right into the body of the can. Take a moment to cut out whatever is left of the top, leaving a nice, clean opening at the top.
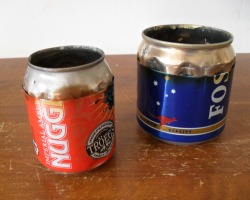
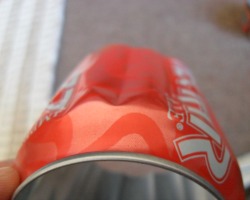
Step 2: Cut the can. A 16oz can is generally about 6” long. I usually aim to cut 3.5” down from the top, so that the bottom piece is 2.5” and the top 3.5”. A 12oz can is roughly 5” long, so aim for a ratio of about 3” for the top to 2” for the bottom. Mark this spot on your can, and then, using your knife point, carefully puncture a small hole in the can’s side, taking care not to dent or compromise the can’s integrity.
Next, take your scissors and cut the can as neatly and evenly into two pieces as possible. Once it’s in two pieces, again use your scissors to clean any burs or slivers. This is best done by cutting towards the inside of the can, allowing a smooth, burr free cut. Don’t fret if your measurements aren’t exact, the stove should still work fine. This is just a useful guide. There are varied opinions on the optimum size, but what is most important is that the bottom of the can sits just at the edge of the top’s tapered neck once assembled.
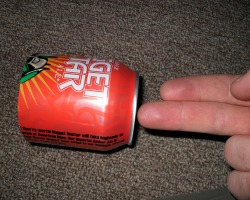
Step 3: Vent the Can. Take a moment to wipe out any remaining liquid or residue in your can. Next, take the top piece, put your pointer and middle finger together, and insert the two fingers in through the opening, pressing them gently against the can’s interior wall. GENTLY and CAREFULLY press the blade of your knife against the outside of the can, aiming it as though it would pass directly in between your two fingers should the can not be there to stop it from doing so. Using gentle pressure, primarily from your fingers in the can rather than the hand holding the knife, create a neat, indented ridge that runs from the bottom up to the edge of the can’s tapered neck. The indent should be far larger on the bottom, and only slight at the top.

Rotate the can towards you, so that the first indent is now below your middle finger, and the space between your fingers is lined up again to make your next indent. Repeat this process all the way around, using one finger as your spacing guide. The vents should space themselves out about evenly all the way around this way, but again, don’t fret if they don’t come out perfect. These ridges act as vents once the stove is fully constructed, allowing the alcohol fumes to filter up through them and burn. Once this step has finished, the top portion of the can should slide easily into the bottom.
Step 4: Add an Air Intake. Pick a spot on the can’s tapered neck, and place your finger gently behind it. Place the tip of your knife, a thumbtack, or anything with a point against the spot, and twist it gently back and forth. Do not apply much pressure, as you want to avoid puncturing anything more than the slightest hole in your can, or your finger. Once you feel the point has come through, you are set. This little guy will act as your stove’s oxygen intake.
Step 5: Build a Windscreen. Alcohol stoves are particularly susceptible to wind, which is something you can expect to come across in all but the most ideal settings. It is a good idea to take the few extra minutes to build a simple windscreen to optimize your stove’s function. All you need to build one is some basic tin foil, which can be found most anywhere for around $3-$4 a roll. Ideally, about 6 paperclips will complete your materials list. First, stretch out the appropriate length of foil. When complete, you want there to be about a ½ inch of space between the edge of your pot and the windscreen all around, so consider that when building your screen. I generally err on the side of a few extra inches, which allows the screen to be adjusted to accommodate a variety of sizes. Once it’s stretched out, flatten it out as smooth as possible. This is something that will be done repeatedly to avoid air pockets forming in your stove, which will expand the screen when the stove is lit. Fold the edges over about a ½ inch on each side, and smooth them flat.
Next, fold the foil in half, and line up the bottom edge of the sheet with the bottom edge of the top fold. Again, smooth it as flat as possible. Lastly, fold the top and side edges over once more, and smooth them flat. Next, form a circle with the screen by bringing the two ends together, and secure it on each side.
Lastly, secure the other four clips on the screen’s bottom, spaced evenly apart and leaving about a ½ inch of the clip protruding. These clips will act as legs or stands that allow airflow to reach the stove while blocking the force of the wind. A windscreen can be successful without paperclips, by simply puncturing a few small holes around the screen, similar to the air intake in your stove. A standard foil windscreen will last roughly 10-12 days with an average use of 2-3 times per day.
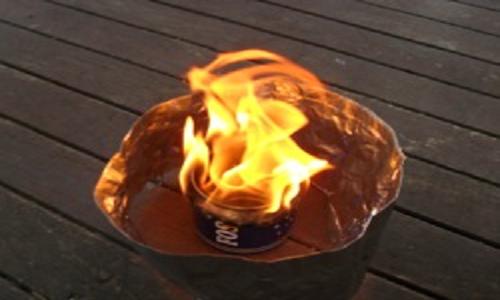
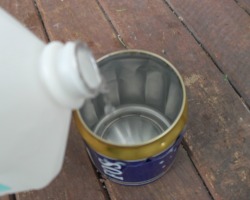
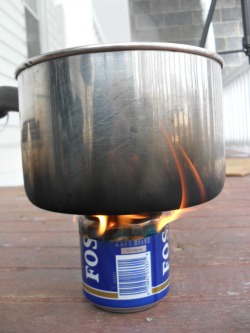
Step 6: Light her up! Congratulations, your stove is complete! Now let’s test her out. First, pour your fuel into the stove. You will find that it doesn’t take much to get her going, but how much fuel you need will be determined by how much water you need to boil, or how large the meal is you plan to cook. The more you use the stove, the faster you will come up with an idea of how much fuel to use in each situation. Once the fuel is in the stove, tilt it slightly, taking care not to spill, and strike your lighter near the surface of the fuel. It should light up instantly. Once it’s lit, give it a moment, and the flame will soon pour out your vents all the way around to form one unified flame. You can now boil water, cook a meal, or even warm your hands if you need!
Step 7: Put Her Out. The only way to extinguish the stove is to smother its oxygen supply. Blowing on it will only risk spattering burning fuel around. Using a small container, simply cover the stove quickly and snuff out its oxygen supply. The flame will extinguish almost instantly. Once extinguished, the stove is safe to touch within a minute. Take care to test it first all the same! Once cooled, remove the top piece, and pour the remaining fuel back into your fuel container from the bottom. It can be reused indefinitely. I typically use a plastic container that serves double duty as a snuff cap as well as a storage container for the stove.
Also Read: DIY Charcoal Water Filter

Disadvantages/Dangers

Because the stove is unsealed, there is the inherent risk of knocking over and spilling burning alcohol, leading to burns. In the case of the denatured alcohol, the fuel burns with a near invisible flame, making it hard to detect. Be sure to have a snuff cap of some kind to extinguish the stove, and take great care and awareness at all times while using one. In general, the stove will work optimally for one or two people. The larger the cooking task, the longer and less efficient it will be. But it will get the job done nonetheless. While it is incredibly light, it does require more fuel to be carried for long distance trips, as it burns almost double the amount of propane or butane stoves. The trick is to just experiment, and you will find your own system in time!
About Joshua Valentine: A lifelong outdoors and survival expert, Josh combines years of backcountry experience with a lifetime of unique and inventive fitness training, designed to prepare the body and mind for the rigors of the wilderness. Josh holds certifications as a Wilderness First Responder (WFR), American Canoe Association Whitewater Raft Guide (ACA), and Personal Trainer (AFAA). He is also a recorded Adirondack 46′r and White Mountain 4,000 Footer.