


How to Find Water in the Wilderness
Fresh drinking water might be right under your feet — in the mountains, forest, and desert, yet you may never know it’s there. You can die just feet or inches from “hidden” sources of water. Learn how insects, wildlife, and reading the terrain can reveal multiple sources of water. Learn how a solar still, solar furnace, and Giant Fresnel Lens can all be tools for providing safe drinking water — anywhere.
 Finding water in the wilderness is essential to survival, especially when it comes to living off the land or traveling over land vast distances.
How to Find Water Near Snow Capped Mountains and Forest
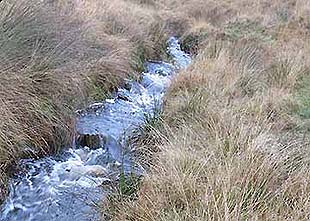
Many mountain ranges offer multiple sources of water, most will be found in creeks and rivers. A few mountain ranges are dotted with small lakes — lots of lakes. The Cascade Mountains in the Pacific Northwest, the Rocky Mountains, and the Appalachian Mountains will have many sources of fresh water, as well the Catskill Mountains and the Great Smoky Mountains.Many parts of the Sierra Nevada Mountains in California will also have sources of fresh water — though as you get further south toward Mexico, you enter much drier regions.
Survivors who find themselves in mountain ranges like the Rockies, Cascades or Sierra Nevadas only have to look for mountains peaks high enough for snow (or simply that have snow on peaks year round), and then look down a specific mountain for crevices in the terrain, often signifying the path of glacier melt water as it descends to rivers far below.
Numerous other small streams may line the mountain also, even if not visible from a distance.
Find Water: Travel Parallel to a Mountain
If you’re a survivor in any of these mountain ranges, finding water is going to come down to traveling parallel to a mountainside. Eventually you will cross a stream. You may even come across a pond or a lake where you can fish and find other wild edibles.When it comes to finding water, you’ve got it easy when in an area of snow capped peaks and forested wilderness — much easier than if you were in a dry, barren region of mountains — more on that in a moment.
Find Water: Dig a Seep
In snowy or forested mountains that receive a fair amount of annual precipitation, you can have success finding and replenishing water on an ongoing basis by digging a “seep”. In fact, you can dig more than one seep, if you’re going to remain in one area for any length of time.In arid mountains (and dry areas of barren wilderness), you can still have success digging a seep, though you’re going to have far fewer places to search for water. Seeps can be dug in crevices or dry stream beds that are lined with green vegetation; the darker green the vegetation, the better chances typically you’ll have of finding water.
Green vegetation along a dry stream bed in the desert or other barren landscape is a sign that there may be water just under the soil.
On the other hand, in a snow capped mountain range or mountainous area of heavy forest, it’s possible to dig seeps in many types of terrain. You’re not limited to dry stream beds as you might be in a dry, barren mountain range.
Where to Dig a Seep to Collect Water
As you walk through a forest or area known for large amounts of rainfall or snow — at both lower elevations and also higher elevations — keep an eye out for damp or dark areas of dirt. These may signify ground water underneath. This is where you can dig a seep.1) Dig wide (about 2 – 3 feet across) and about a foot deep. Your seep should hold a few gallons of water. As you dig watch for water to slowly seep into the hole. Congratulations — you have found an area that will work for a seep.
2) Next, line the walls and the bottom of the hole neatly with small rocks (which will help reduce the amount of sediment stirred up by movement in the water — for example, when you drink).
This water should be fairly safe to drink, as it’s coming right out of the ground, filtered naturally by dirt.
3) If you return to your seep at a later time, wildlife may have drank from it and it may no longer be clean. Scoop out as much water as you can and then let the hole refill with water. Once again it should be fairly safe to drink.
4) Filter the water through a shirt or other cloth to remove sediment. If you have the means, boil it before drinking just to be absolutely sure it’s safe to drink.
5) To help reduce wildlife from drinking from the seep you’ve dug, look for large, flat rocks you can cover the hole with. You can also use brush and tree limbs to conceal it — drape tree branches over the hole, supported by two mounds of rocks on either side of the hole.
Filtering Creek and River Water
A seep can be used to filter creek and river water. About a foot away from the water’s edge dig a hole capable of holding a few gallons of water. Give it a few minutes — water from the creek or river should slowly fill the hole as it seeps through the soil. This water should be much safer to drink than water straight from the creek or river, which may be contaminated with bacteria.You can also do this with lake and pond water as well; because lake and pond water is more contaminated by bacteria and parasites typically than a river or stream, you can build a second seep, next to the first seep. This will create a second “natural” filtering layer of soil that water will have to travel through.
1) Dig a second, smaller hole a few inches away from the first hole. As the first hole fills with water, water from that hole will slowly seep into the second hole. That water (which has passed through two walls of soil) is now a bit safer to drink than if it had only passed through one wall of soil.
There’s no guarantee though that it’s completely safe to drink. If you have the means to boil or filter water that you’ve harvested from a seep hole, do so. Better safe than sorry.
2) To avoid clogging any artificial filter you have with you, pour water first through a cloth to remove sediment, then filter the water using artificial means.
How to Find Water in Barren, Arid Mountains
Finding water in the mountains won’t be an easy feat for survivors in areas that receive little rain.You’re going to have to study the landscape for the telltale signs that water may be present, even if it’s not visible anywhere. A good sign of water will be areas of dark green vegetation.
A great way to study the landscape right from home is to use Google Earth’s terrain feature (also available on Google Maps). Study a nearby mountain range and also dry, barren wilderness areas and look for lines of dark green vegetation. There’s a good chance there’s a stream there — or simply a place to dig a seep to reach water flowing through the soil. Also, as you study Google Map’s terrain feature, notice dark clusters of vegetation in rocky, barren desert areas — these may be springs, where ground water flows from the earth or where water simply collects after a rare rainfall takes place in the area.
1) Now that you know how to recognize areas in the terrain that may provide water, on the ground and in the desert or barren wilderness try to locate a dry stream bed lined with green vegetation.
2) Once located, your next step is to determine the best place to dig your first seep.
Remember, even if there’s no water above ground, that water may still be there; however, the stream may run underground, even if it’s just a trickle.
Digging a Seep in a Dry Stream Bed
1) Follow a dry stream bed until it bends. Look for water (in the ground) on the outside bend — that is where gravity would pull the most water when that creek had water running above ground (following a rare rain, for example) and where an underground trickle may still exist if being fed by a spring from a higher elevation.
2) As you’re inspecting bends in a dry stream bed, look for dirt that is a shade darker than the surrounding dirt. Also, look for dirt that is lower in the ground than other areas of dirt in the area you’re inspecting — a shallow depression or natural bowl. That can be the first place you start digging — the lowest point.
3) As you’re digging down, look for the dirt to turn darker shades — that will signify the presence of moisture in the ground. Keep digging — the hope is that you will get down to mud/wet dirt. Once you’ve gotten down to mud/wet dirt, dig a little deeper, and put in a small container for collecting water.
4) Go rest for a few minutes; return to the hole and inspect if for small amounts of water collecting in the area that you’ve dug out. This will signify that yes, indeed, a trickle of water is traveling through the ground soil.
5) If no water has appeared, you can head further inland (to a higher or lower elevation) along that path of dark green vegetation, and try digging in a second location. The trickle stream may be a bit stronger there. If not, continue to search.
6) If the ground is damp after digging a seep, but no water is collecting, you can consider building a solar still there (see below).

Watch for Signs of Wildlife to Signify Water
Animal Tracks: You’ll also want to look for signs of wildlife, such as animal tracks in the ground, which are likely to lead either to water or even to where a specific animal beds down at night. When animal tracks come together on game trails, often these trails will lead to water.Animal Feces: You may not spot tracks as easily as you spot animal feces. If you find feces, study the terrain for a probable route that animal was likely to travel (such as a game trail) and consider heading in that direction to look for water. The feces of predators may not always be a good sign to look for; predators get moisture from their prey; though, yes, they also drink from water sources periodically. Keep that in mind. If you believe you’re following a trail marked by tracks and feces but not coming across any water eventually, you may be on the trail of a predator that is not heading to water at that specific time.
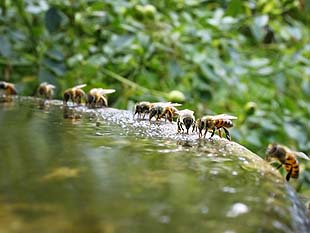
Mosquitoes: The presence of mosquitoes are also signs that water is nearby, usually standing or slow moving water, as that is where mosquitoes often breed.Bees: Bee hives are located within 3 – 5 miles of a water source, whether if that hive is in a tree or down in the rocks or a stump. Once you’ve found a hive, climb a tree (if possible) or get to a high point so you can see across the landscape — look for areas of dark green vegetation — that may be where the bees are getting their water.
If you simply spot a bee buzzing around, that flies off in a straight shot, watch what direction he flies — it’s either to a hive or probably a water source.
Also: If you spot a hive, study the hive for a few moments and pay attention to the bees flying to and from the nest — what direction are the majority of bees traveling? It may point to water.
Ants: If you can find a line of ants, you may find a line pointing right to a water source. If that line of ants climbs up a tree and into a hole, there may be a natural water catch right inside that tree. The ants found it at some point and now so have you. Put a thin stick into the hole, and pull it out — is there water on it? If it’s wet, there’s water inside. Use a knife or sharp rock to bore the hole big enough for a straw to fit through. Odds are you won’t have a long straw with you though — consider this (a long, thin straw) something you should scavenge for early in your travels, or simply carry with you in your backpack beforehand.
Worst case scenario: If there’s nothing you can make a straw out of continue to bore through the tree with a knife or sharp rock, making the hole large enough for you to dip long grass down or even a shirt sleeve or sock (tied to a stick) to soak up water, which can then be squeezed into your mouth.
Flies: Flies are an even better sign to look for than bees as flies typically travel no further than 100 meters from a water source.
Birds: Then there are birds to watch for also. When looking for wildlife, insects or birds, look for those that are in groups — a group of mosquitoes, a group of birds, etc. Groups of wildlife are going to call for water for their survival. Water will typically be nearby.
Watch for small birds — grain-eating birds for example — and pigeons specifically in the morning and evening hours. A bird’s direct flight (one that is straight over land) can lead you in the direction of water. Don’t use predatory birds as signs of water — they may get a lot of their moisture from the prey they eat. If a small bird or pigeon is flying from tree to tree — rather than a direct flight over land — this is a bird that may have already gotten it’s fill of water, depending on the time of day. It won’t be a good indicator of the direction of water.
Locate Crevices to Find Water
In arid mountains (or any mountain range), water can accumulate from rain fall, running between large rocks and boulders and form pools on the tops of other large rocks and boulders. Look for crevices between boulders, and especially look for crevices that lie in shadows when the sun is high overhead.While the sun would have otherwise evaporated pools of water that have collected from rain fall, crevices that lie in shadow may greatly reduce any evaporation, making it possible for water to remain for days at a time, depending on the size of the depression where water has collected.
Be Alert for Presence of Toxins
If you find a source of water, especially standing water, and there is no vegetation or wildlife present, the water may be toxic. Dead wildlife or simply bones may also signify toxic water. Inspect the edges of the water for the presence of residue — this residue may signify alkaline conditions.
Avoid Water in Agricultural Areas
Water found in areas of farm land may be contaminated with pesticides. Large rivers will have enough fresh water flowing to dilute these pesticides to levels not likely to harm you (in the short term). However, streams and irrigation channels are likely to have larger concentrations of pesticides, which can be harmful.It is best to simply not drink this water. Boiling water with pesticides (and heavy metals, for that matter) does not remove the pesticides; it only kills harmful bacteria. The pesticides will still be there.
Find Water in the Ocean, an Island, and Desert Salt Lakes
Condensing Salt Water – Make Salt Water Safe to Drink
What if you’re in a boat stranded in the ocean, on an island, or traveling near the coast on the mainland? The ocean itself, sea, or even a desert salt lake (deserts tend to have lakes with high salt content) can provide ongoing fresh drinking water — first though you’ll have to learn simple ways to condense salt water and produce pure water that is safe to drink.There are two ways to condense salt water. The first way is to:
1) Fill a metal container (such as a large pot) with 2 – 3 gallons of sea water.
2) Heat large rocks in a fire.
3) Once hot, drop these rocks into the pot of sea water, until the sea water is boiling, or simply hot enough to produce vapor.
4) Cover with a towel or other cloth or even a blanket so that the water vapor is absorbed. Once damp, ring the water out of the cloth and into your mouth or a water bottle for later consumption.
The second method works when no pot or other metal container is available:
1) Dig a narrow pit capable of holding 2 – 3 gallons of sea water.
2) Once again, heat up rocks in a fire.
3) Once hot, drop these rocks into the pit of sea water, until the sea water is boiling, or simply hot enough to produce water vapor.
4) Cover with a towel, etc. and collect water vapor, which you can ring out into your mouth or into a container.
Build a Solar Still
1) Similar to digging a seep, to build a solar still (for the purpose of producing water vapor — in other words, distilling water) dig a fair sized hole (large enough to hold 5 – 10 basketballs) and then put a container (such as a water bottle or milk jug with the top cut off) at the bottom of the hole.
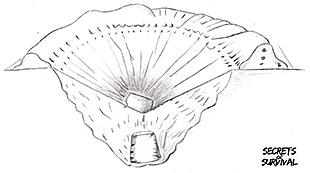
2) Do not fill this hole with sea water. Instead, collect green vegetation and line the hole around the container. If you have pond water or sea water present, you can pour small amounts of water into the hole also — not a lot, just enough to dampen the hole and vegetation lining it. Be sure not to let this water or vegetation get into your container for capturing clean water.
3) Cover it with a tarp. Anchor each corner of the tarp with a large rock.
4) Place a rock dead-center of the tarp, right above the container that is at the bottom of the pit. That container is there to collect condensation that will form on the underside of the tarp as water vapor is produced by the heat inside the pit; that heat is created by the sun beating down on the tarp — thus the reason for the tarp.
5) You will now need a way to drink any water that is collected. One way is to simply pull back the tarp and reach down and grab the water bottle or milk jug (or whatever container you’ve used) and simply drink from it.
A less time consuming way would be to use a straw — an extremely long straw — one that will stretch from the container at the bottom of the pit and out from under the tarp, where you can drink from it, without having to pull back the tarp.
A surgical cord or other long, thin tubing will work great in this regard. Be sure to carry one or both in your survival kit (as well as a small piece of tarp that will work as a solar still).
If no sea or pond water is handy, you can even urinate into the hole (just not into the container). The point is to pack the hole with objects containing moisture without covering the top of the container that is catching water as it drips off a low point in the tarp above.
6) Give the solar still a few hours time to go to work. As the sun beats down on the tarp, the air under the tarp will heat up. This heat will cause the moisture from green vegetation, from pond or sea water, and even from urine to evaporate into water vapor, which will rise and collect on the bottom side of the tarp, becoming condensation. Within the first couple hours you can start taking your first small sips of water.
Solar Still Specifics: In the center of the hole, on top of the tarp, that small rock you’ve placed must be directly over the container in the pit down below — or the condensation is going to drip off the tarp and miss the container. This rock in the center will create a sharp depression in the tarp — a central point that is lower than the edges of the tarp. What will happen now is that when water vapor underneath becomes condensation on the underside of the tarp, it will flow down to that central point where the rock has been placed — this is where it will now drip down as liquid water to whatever container you have placed at the bottom of the hole.
Tip: Every few hours pull back the tarp and replace the drying vegetation with additional green vegetation; pour a small amount of pond or sea water into the hole; urinate into the hole; etc.
Tip: If you have any sewing thread in your survival kit, when constructing the solar still hang a thin thread from the center of the depression in the tarp. When water condenses and flows down to the low point in the tarp, it will then hit the thread, and travel down the thread — straight to the container below. (A long piece of grass will also work). The thread helps ensure that the water makes it into the container, rather than misses it because you’ve failed to line up the depression of the tarp with the open part of the container for capturing water.
Tip: If you don’t have a tarp, you can also use a large garbage bag or even a water proof poncho.
One solar still can continue to produce a small amount of water each day, day after day. Several solar stills will obviously produce more water — so the more people in your party in need of fresh water, the smarter it will be to build additional solar stills.
Homemade Water Filters and Water Purification
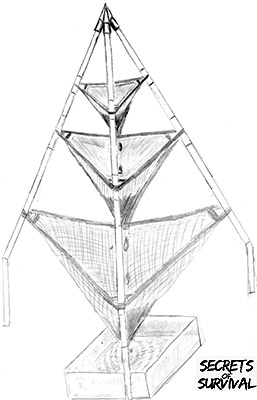 |
“Homemade” Tripod Water Filter
Like a seep, a “homemade” tripod water filter uses objects from the environment to help filter water from lakes, creeks, and ponds.Charcoal, sand, dirt, and cloth can all be used in layers to not only help remove sediment, but to also improve the taste of water, especially from ponds and lakes.
Note: If a pond is stagnant — just standing water — find somewhere else to drink — especially if there’s algae present. Standing water typically has the highest concentrations of bacteria. The mud around the pond could be areas that deer, elk, and other wildlife has urinated in.
If a pond has an inlet though, and no algae present, that means that fresh water is being fed into it. This water could be considered (if no other water is present) to use if you filter it first using natural methods (charcoal, sand, dirt, cloth).
How to Build a Tripod Water Filter
1) A common way is to first build a tripod out of three long, sturdy sticks. You’ll then use three sections of sheets, bandannas, or even shirts and create three layers, the widest layer a few inches off the ground, tied to each of the three sticks. A few inches above that tie the next layer; and finally, a few inches above that, tie the top layer.2) Place charcoal (from burnt wood from the forest — not briquettes from the store) on the bottom layer. Place sand and dirt on the second layer, and then more sand, grass or even a sock or other folded cloth on the third layer.
Your goal is to remove sediment and particles in the water. Realize that if there’s dangerous bacteria like Giardia in the water, this kind of filtering will not remove the bacteria. It only removes the sediment and improves the taste (which is what the charcoal is primarily for, though it may also help reduce the amount of bacteria in the water).
3) Pour pond water through the top layer, which will then collect, and begin to seep through, dripping down to the second layer. Here it will collect again and begin to seep through, dripping down to the third layer.
4) On the ground, beneath the third layer, have a container ready for capturing water.
The final product won’t look like clean water from the tap, but it should be a lot cleaner than what you first started out with. It should taste and smell better also.
Drink it as is, if you have no other choice — or if you have the means, boil it first — just to be certain that it’s safe to drink.
5) Finally, before you even build that tripod with 3 layers of filtering, dig a seep a few feet away from the water source. Let that seep fill with water. Because that seep has been filtered by a few feet of dirt, it is cleaner water to begin working with.
Note About Lakes and Ponds
Rivers and creeks make better choices than lakes and ponds — in the wilderness, away from population centers, there will generally be less concentrations of bacteria in the water in rivers and creeks. Only consider pond water if there is no other choice. Don’t drink from ponds that are stagnant (no inlet of fresh water, like a brook or stream).Sometimes it’s difficult to tell if a pond is stagnant or not.
Place a leaf in the pond water and then watch to see if the leaf drifts from movement in the water, or if it simply stays put — signifying stagnant water that’s not safe to drink. As long as the wind isn’t blowing, this is a good way to tell if the pond is stagnant or not.
Avoid marshes and swamps, typically bodies of water that carry higher concentrations of bacteria and parasites as well.
Avoid small lakes and ponds in agricultural areas (due to pesticides and herbicides). Avoid water near industrial areas or — in populated regions — residential or commercial districts. Illegal dumping by residents and businesses and environmental pollution increase the chances of unsafe chemicals being present in any water you come across.
Head further out of town and well away from roads, if possible, to find water sources.
Solar Tools for Water Purification
Use a Giant Fresnel Lens for Water Purification and Distilling
The Giant Fresnel Lens is like a magnifying glass on steroids. Keep this thing in a bag until it’s ready to be used, like Perseus carrying Medusa’s head in a bag in Geek Mythology. With a Giant Fresnel Lens in your survival kit, make sure you know what you’re doing and can take necessary safety precautions before putting this beast into action.The idea is to harness the power of the sun — by greatly magnifying it’s rays on to a single point, capable of incredible amounts of heat in a very short period of time.
Using a Giant Fresnel Lens is going to call for some tinkering — it also comes with a bit of risk — you can severely injure yourself if you’re not careful. You can melt asphalt, catch wood on fire instantly, and even blind a person in an instant.
Take a moment to watch this brief video on YouTube produced by “GreenPowerScience”.
Here’s a link to buy one for less than $10 on Amazon. (A reviewer on Amazon happened to use this specific one to boil water with his son — and mentions a YouTube video — probably the YouTube video above.)
With the right size lens, it won’t take long to boil water — which means it can be used to purify fresh water sources as well as boil salt water for the purpose of distilling water, producing fresh drinking water (see “Condensing Salt Water” above).
Don’t mistake a “Giant Fresnel Lens” with a much smaller Fresnel Lens that can be used as a simple magnifying glass to help get a fire started.
Keep in mind — a Giant Fresnel Lens will call for sunlight — so, if it’s cloudy and raining in your neck of the woods for days at a time, a Giant Fresnel Lens may not have much use for you until a sunny day rolls around, or simply a partial sunny day.
Heating Rocks, Bricks, and Steel with a Giant Fresnel Lens
Considering the high amount of heat produced on a single focal point by a Giant Fresnel Lens, here’s an additional use to consider: Heating stone, brick, or metallic objects and then using these objects to radiate heat into a survival shelter (buy yourself some sturdy tongs capable of carrying hot objects).Imagine a makeshift cabin with a built in heater. That’s the idea. The Giant Fresnel Lens has potential to be a serious long term survival tool — you will have to experiment with it first, as well as research and talk to people who have used it for specific purposes.
Additional Use: In a long term survival situation, a person can hollow out a large log and fill it with water (like an 18th century homesteader building a trough for his horse), drop in a hot steel plate or brick, and have a hot bath ready within minutes. Want to take a hot shower? Drill 20 – 30 tiny holes in the bottom of a large bucket and hang it from a tree limb. Using another bucket filled with water, drop in a heated rock, let the water heat up; once hot, pour this water into the bucket hanging from the tree limb. You may have a 5 – 10 minute hot shower on your hands in just a few moments.
Note: A modern day blacksmith could probably use a Giant Fresnel Lens to mold scrapyard steel into tools and weapons, saving vast amounts of firewood or coal burning.

Numerous Giant Fresnel Lenses could probably find many uses in a community rebuilding from widespread disaster.
Build a Solar Furnace
If you can build a solar still, as laid out above — and if you can put a Giant Fresnel Lens to work as a survival tool — well, realize you have the ability to take this a step further and build a solar furnace. Many solar furnaces have been built in backyards and science classes around the world. Depending on what kind of solar furnace you build you can heat the air to heat your home or you can heat water for the purposes of boiling or distilling water, similar to that of a Giant Fresnel Lens.Books: Build Your Own Solar Furnace
In fact, the use of a solar furnace is being recommended as a way to bring clean drinking water to remote areas of third world countries.
Four aerospace and mechanical engineering graduates who worked together on a solar furnace project even mention electricity production. Electricity can be produced by a solar furnace by focusing high amounts of heat on a heat engine (like a Stirling engine) which turns a generator, that can then power up to 2000 watts of electricity — as long as the sun is out, that is. See: Solar furnace project cranks up the heat.
(Connected to a string of batteries, electricity generated by the heat engine that day could be stored for that night’s use — providing heat and light, for example, until the next day’s sun rise).
by Mark Lawrence