


Last time, we investigated parts for the AR-15 lower. Now we turn our attention to the upper and some important accessories. These choices were researched in February, 2017. Note that this means this list of parts, prices and sources may not still be valid, and was based upon my preferences and budget, so may not be the best choices for you and your particular needs.
The AR-15 Upper
The upper consists of the top part of the receiver, Upper Parts Kit (dust cover and forward assist parts), chambered barrel, barrel nut, hand guard (to keep you from burning your hand on a hot barrel), gas tube system, bolt carrier group (BCG) and charging handle. You can get this as a complete assembly, complete minus the BCG and charging handle (because there is a wide variety of possibilities for each of these), or as individual parts so you get exactly what you want. Personally, I prefer that my barrels be professionally head spaced, so I would tend to not get individual parts unless I could not find a satisfactory complete upper or there was a MASSIVE savings achievable.
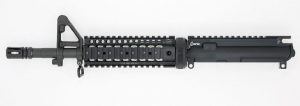
The choice for the top part of the receiver is generally aluminum (forged or billet), steel or stainless steel. Most common is a “flat top” which just has a picatinny rail on the top, or you can find one which has the “handle” reminiscent of the M-16. The gas tube selection is fairly tightly controlled by the ammo the barrel is chambered for and somewhat by barrel length; the major choice left is the gas block style. This system sends some of the gas back into the upper, which can lead to fouling in the action. The latest technology seems to be to replace the gas return system with a piston to remove any chance of fouling, but this will cost between $250 and $350 additional; it can be added later and I would recommend ensuring the firearm works “normally” first.
Your most difficult choice is likely to be the barrel. Start with the caliber. There is the 223 chambering which is the civilian version of the round, and may have problems firing (more accurately, extracting after firing) the 5.56 military version of the round. Or there is the 5.56 military version of the round, whose chamber will function with the 223, but loses some accuracy with it. A nice compromise is the 223 WYLDE, which will shoot both versions of the round with good accuracy. Or you can get a barrel set up for 7.62×39 (the AK round), or various “wildcat” calibers like 300 Blackout, 458 Socom or 50 Beowulf, or a number of other calibers which are less common. Someone, somewhere, has managed to accomplish any caliber with a magazine short enough to fit into the AR-15 receiver (or for that matter, longer calibers as single shots). Next there is the length of the barrel, pistols generally being about 7.5″ or 10.5″ and rifles being 16″ (the legal minimum, for easy handling and up to 200 or 300 yard effective range) and longer (for more range).
For a tougher choice, there is the spin rate of the rifling which is rather dependent on the weight(s) of bullet you are going to be using. Actually, the length of the projectile and the velocity are the actual key factors, but the weight tends to be related to length, and velocity tends to be related to weight. Thus weight is used because it works “well enough” and is easier to use.

Spin rate, or “twist” is specified as “1 turn in # of inches”, for instance 1:9″. At any weight bullet, a shorter distance for one complete revolution results in a faster spin, and enough spin to act as a gyroscope ensures accuracy. Heavier bullets do not go as fast, so do not spin as fast as lighter ones in the same twist barrel. All bullet spin slows down over distance. When a bullet spin slows down enough to lose gyroscopic stability, it can tumble and accuracy becomes terrible. Thus bullet weight (more precisely length and velocity), barrel length, and spin rate are key factors in defining the effective range of use, and this can vary with temperature and altitude.
Here are the most practical current twists:

“Not the best” on the heavy end means that the bullet spin slows down and discards accuracy at a relatively short range. “Not the best” on the light end means that the bullet might fly apart (due to being fragile and spinning very fast), which again means no accuracy. So unless you know just what twist you need for a specific purpose, 1:8″ seems the most versatile choice, with 1:9 optimized for light bullets and 1:7 optimized for heavy bullets.
Then there is barrel profile, either standard or HBAR (Heavy BARrel). HBAR tends to be more accurate (flexes less as the barrel heats up), but is heavier. “Fluting” (grooves or dimples) removes a little of the weight of a heavy barrel and it looks sharp, too. Many “standard” barrels have a “M4” profile, which “looks clunky”. There are also “pencil” barrels which are quite light, but heat up very quickly, causing the point of impact to “string”. And there is the material to choose: steel or stainless steel or even carbon fiber wrapped (another way to lower weight). The steel barrels are available in a number of finishes to combat corrosion.
Handguard length and style are a matter of personal preference. You don’t want one which is LONGER than the barrel or SHORTER than the gas tube system, but between those limits it can be whatever you prefer. Some are set up to allow flexible attachment of accessories; the major competitors for this are the pubic domain “Keymod” system and the Magpul’s free license “M-Loc” system.
My Upper Choices
Delta Team Tactical has been sending me regular emails with sales on with what seem like good uppers (by Davidson Defense) at good prices, which is half the reason I got interested in this project. Thus I’ll likely get my rifle upper from them. Without a BCG or charging handle, they start around $209 and go up to one WITH these parts for $425.99, so I can get pretty close to what appeals to me. They have a pistol upper or three for $199 which look pretty good as well. Note that they seem to run a few weeks behind in shipping uppers and a few other parts, and may require a reminder phone call.
One alternative which intrigues me is the “no lube” claim made by Anderson Rifles. This is due to a “RF85” treatment which is mostly available only on their complete firearms. They do have complete uppers with and without barrel and handguard, but not a barrel I like.
Variation between BCGs is a bit of a mystery to me; the major difference seems to be the “coating” or “finish”. Looking at companies with a good selection, it appears that “Nitride” finished ones seem to be entry level in the $75 range, while “Nickel Boron” seems to be a better grade, in the $150 range. And I have seen “light” ones, as well as AR-15 (seems to be “standard” weight) and M-16 (sort of heavy weight) styles. I prefer the heavy one and the buffer to match. As for the charging handle, any mil-spec one will do, although one with an extended latch may be useful if you’re putting on a scope and Delta Team Tactical has one like this for $18.99.

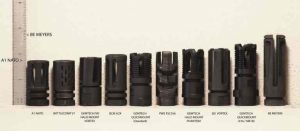
The barrel will often have a flash hider or recoil compensator on it. For many people, this is mostly decorative, but if you need one more capable (or California compliant) than the one there, you’ll need to search for one which will meet your needs. And perhaps pay a fair amount, since some of these cost over $100, such as an alleged top performer, the Lantac Dragon. I’m not concerned with, nor can I afford, this at the current point in time, and don’t like the “jagged” end ones, so will probably go with a simple round one with ports only on the side and top, and a price of $25 or less.
Or I might just stick with whichever one comes with the barrel. If you choose to not have one for aesthetic (or legal) reasons, it would be wise to put a threaded collar on the barrel end to protect the threads or get a barrel without the threads. And be careful that if you remove or replace a flash hider that the barrel length (of a rifle) does not drop below 16″ (some barrels are 14.5″ and use the flash hider to meet the 16″ requirement). As I understand it, this setup must have the muzzle device “pinned” to the barrel in order to be legal.
AR-15 Accessories
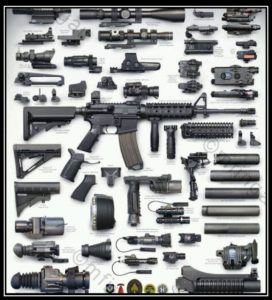
That is everything you need to make the gun shoot, but there are still things to add to make it usable. Most important are sights. If you got an upper with the “handle”, the rear sight is part of that, and you’ll need the matching front sight which clamps on the barrel. But if you got a flat top, you will need a set of sights which clamp to the picatinny rail which runs the length of the upper receiver and the handguard. Note that a lot of people add battery powered optical sights or scopes. Even if you plan to mount optics it is a good idea to have flip-up “iron” sights as backup in case the fancy optics batteries die or it gets broken. For inline sights, you can get a set for as little as $20 a set, but many of these are junk. Magpul has some good ones made of polymer; one of the few companies that do that well, and they will cost $70 or more a set. Going up from there, you can easily spend a couple of hundred. Another option is “45 degree” sights, which clamp onto the picatinny rail and stick out to the side at a 45 degree angle. To use these (without having to remove your optics), just rotate the firearm 45 degrees until they are vertical. These are particularly useful if you have a scope, while the flip up ones can sometimes be used without removing the “red dot” optics.
Note that you want to have your eyes perfectly in line with your primary sight system when you bring the firearm to your shoulder. If the sight system is too high, add height to the comb using risers which permanently attach or strap on, or are part of an elastic sleeve around the stock. If the sight system is too low, and there is no way to lower the comb, you could try a different stock, or just get a riser to raise the sight system.
A sling is very helpful, and in order to attach a sling, you need sling mounts on the firearm. Many stocks have one or more built in sling mounts or places to attach sling mounts, and a tactical sling mount plate can be mounted between the stock and receiver. For the front end, there may be a sling mount on the handguard or which can be attached to the handguard, or clamped to the picatinny rail. As for the sling itself, a two point sling convertible to single point is often the most effective choice for a tactical firearm. For heavy firearms, the 2″ UrbanERT e-RUSH seems a good choice, but if the firearm is relatively light, the 1 1/4″ MagPul MS3 or MS4 sling or the 1″ Cetacea Rabbit also look to have promise.
Of course, you need some magazines. The bigger the magazine, the more rounds you can fire without reloading, but the further it sticks down from the firearm, the heavier it is, and the greater the chances of a feed failure or the magazine catching on something or getting knocked. A drum can fix the length problem, but not weight, and the cost of these tends to be high. I probably would not have any magazine with greater than 30 round capacity, and would be more comfortable carrying with a 20 round capacity magazine inserted. I’d also get at least one magazine (ten rounds or less) which would fit flush into the receiver.
I’m planning to go with Magpul PMAG Gen3 (Gen2 have durability issues) for my primary magazines, as they are pretty much the current standard, available in 10, 20, 30 and 40 round capacities, have colors other than black, and are available for $15 or less. Lancer has a hybrid with translucent polymer body and metal feed lips which seems to have potential, but a higher cost. If metal magazines are preferred, insist on at least international military (STANAG) quality ones, preferably from D&H or Colt. Ammo Storage Components (ASC) magazines also seem to be a decent choice. Magpul or equivalent anti-tilt followers are recommended in any magazine to minimize feeding issues.
A short picatinny rail on the bottom of the handguard is useful for mounting a light or laser or even a combination.
Total Cost
If you have the tooling, settle for the basics and shop wisely, you should be able to bring this in under $500; I found a kit with everything (including sights) except for the receiver for $399 and you will likely be able to beat that if you shop hard and effectively. Of course, pretty much every part can be upgraded, so $800 is a better target for a significantly improved version. And if you want “the best” and/or don’t have the inclination to shop around for best price, $1200 and up is not difficult to manage. If you can’t afford the firearm you want, build one which can be upgraded later.
In the next article, I will relate my experiences completing the Tennessee Arms receiver using their jig and a drill press and a forged receiver using the Easy Jig and a router.