


The power of simple machines, smartly employed, are capable of moving most anything. Over the years I helped my daddy move really heavy stuff in his plumbing/welding business and on our farm. He once moved and installed a new 3,000 gallon metal water tank at our elementary school using only ropes, pulleys, and levers… by himself.
Daddy didn’t possess superhuman strength, he simply understood the power of simple machines.
Give me a lever long enough and a fulcrum on which to place it, and I shall move the world.
Archimedes
I first discovered this ingenious flip-flop winch from a YouTube demonstration by Mors Kochanski, the Godfather and author of Bushcraft. A search of flip-flop winches on YT will garner several clips demonstrating the power of using two logs and some rope. So why would I add my video to mix? Because it’s only theory until you put it into action by Doing the Stuff!
The flip-flop winch combines two simple machines, lever and pulley (wheel and axle), as a force multiplier to free vehicles stuck in the mud, safely dislodge hang-ups when felling trees, and/or move heavy rocks. I decided to pull my truck up a slight incline in a field.
Related: Make an Improvised Bow Saw
Flip Flop Winch
In an emergency vehicle kit, weight and space are not an issue – unless you tool around in a Smart Car. For this winch, all you need are two logs and some rope. Of course, you’re not hauling eight foot logs in your vehicle. You will have to cut those with your truck ax or takedown bucksaw.
Material and Tools
- Ax or Saw – cut two logs about 8 feet in length
- Rope – non-elastic is preferable for safety reasons
- Cordage – enough to make two loops about 1 foot in diameter
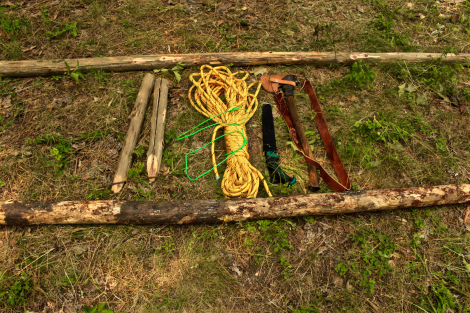
L to R: Green paracord loops, 100′ of rope, truck saw, truck ax. Top pole – lever pole. Bottom pole – pulley pole.
Cut Two Poles
You’ve hit a ditch or snow bank (rarely happens in Georgia) in the hinter-boonies and need to get unstuck. Reach into your vehicle emergency kit and fetch your saw or ax. You have an emergency vehicle kit, right? Be sure to add 100 feet of strong rope to the kit if you haven’t already. A tow strap won’t be useful with this winch unless it’s really long.

Scout for a straight tree (dead or live – it’s an emergence) to cut. Anything between 4 to 6 inches in diameter is suitable. Cut two lengths in the 8 foot range. De-limb the poles by chopping any branches off with your sharp truck ax. You can saw them off but proper ax-manship makes quick work of the de-limbing. This process is best done by cutting from the trunk end to the top end of the pole. Keep the pole between your body and the moving ax.
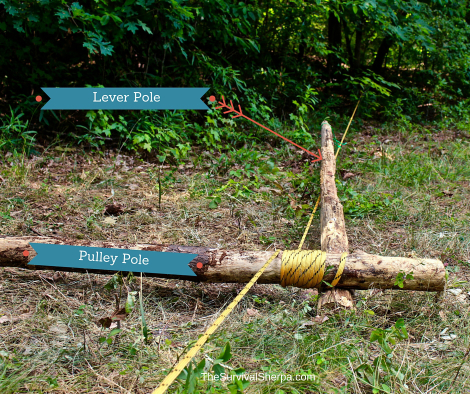
Lever and Pulley Pole
Now that you’ve got two poles, one will be used as the “lever pole” and the other will be your “pulley pole.” I noticed in my video that I called the drum pole a “barrel” pole interchangeably. In this written tutorial, I will use “pulley pole” to hopefully clear up the verbiage. The terminology is not that important. What you need to know is that the pulley pole is where the rope will coil similarly to that of a modern come-along.
Using Rig 2 causes the rope to coil on one side of the pulley pole
A larger diameter pulley will winch more rope with each revolution. The pulley pole I used was a standing dead pine which was a bit lightweight for the job. I was forced to drive two stakes in the ground to prevent the pulley pole from swinging in towards the tensioned rope in our video. With two people available, the stakes wouldn’t be necessary. A heavier pulley pole will solve the issue as well. I wanted to simulate and experiment with the lowest quality wood I could scavenge. The lever was a smaller dead cedar but the most solid of the two poles.
Read more: Survival Bow & Arrow: 6 Reasons You Should Consider Owning One
Locate an Anchor
The base of a live tree is perfect. A dead tree is not a good candidate. You’ll risk toppling the tree down if the object you’re pulling is really stuck or heavy. Wrap the rope around the base of the anchor twice and tie it off with a tensioning knot.
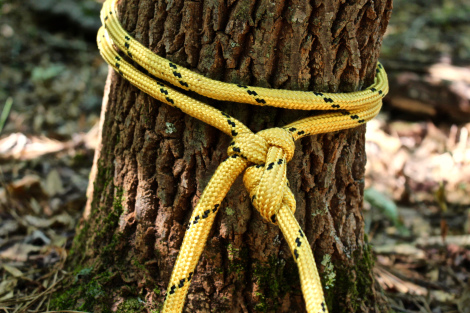
The base of a Sourwood tree was used as an anchor point.
Ideally, you want the anchor point and the object you’re pulling to form a straight line sighted down the rope.
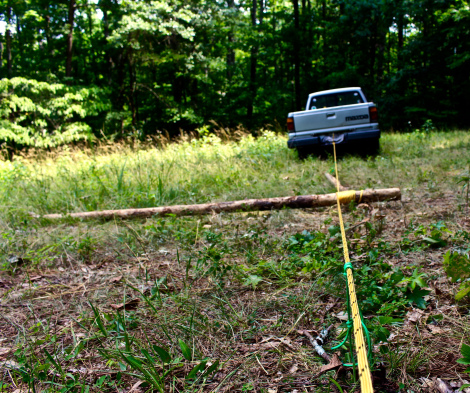
Both truck and anchor point are lined up for optimal pull.
2 Rigging the Systems
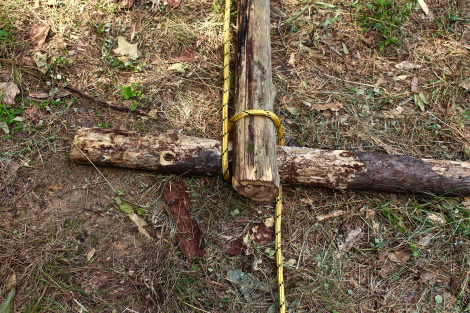
Midway between the anchor and object lay the two poles perpendicular to one another. Run the rope on top of the pulley pole about a foot from the larger end of the pole. Pull the rope back under the pole to form a loop. Insert the lever pole into the loop from the side of the pulley pole where the loop is formed. Give yourself about a foot of lever sticking through the loop.

The loop formed to receive the lever pole.
There are two methods of rigging the winch. Rig 1: One causes the rope to coil on both side of the pulley pole where the lever pole crosses (demonstrated on the video). Rig 2: This technique causes the rope to spool on one side of the pulley pole. I’ve found that the latter method causes less side-to-side torque since the rope remains in a straight line.
With the winch rigged, pull the slack out of the line and tie to the object you’re pulling. Another tension knot will work.
Start the Flip-Flop
Flip the lever pole up and over the pulley pole. Once on the ground, check the first wrap on the pulley pole. This is the time to straighten the loops around the pulley before real tension begins. Try to keep the rope from spooling on top of the previous coils as this may weaken the rope. With each flip-flop, the rope will begin coiling on the pulley pole.
Rig 1: This set up will spool rope on both sides of the pulley pole (shown in the video)
Note: I’ve watched others spool rope on one side of the pulley pole only. This technique decreases the swing of the pulley pole towards the rope under tension. To use this method, place the rope attached to the anchor and the object on the same side of the lever pole before flip-flopping.
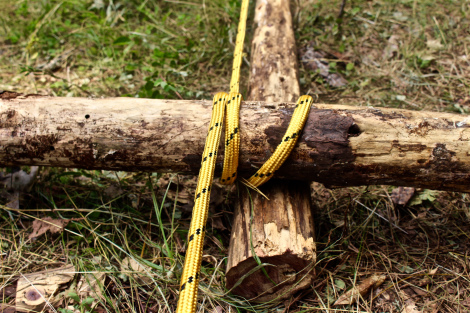
Rig 2: One revolution with the rope spooling on one side of the pulley pole
Notice how the rope coils to one side of the lever pole (Rig 2). With the rope in line, the pulley pole is less likely to torque in towards the tow rope..
Now, flop the pulley pole over the rope for the next flip of the lever. If the pulley pole was magically suspended off the ground, no flop would be required. This would become a Spanish windlass. You’d simple spin the lever around a wheel and axle. The earth prevents this continuous spin. But the ground is what keeps the system from unraveling. The flop of the pulley pole is necessary for the lever to make another 180 degree revolution.
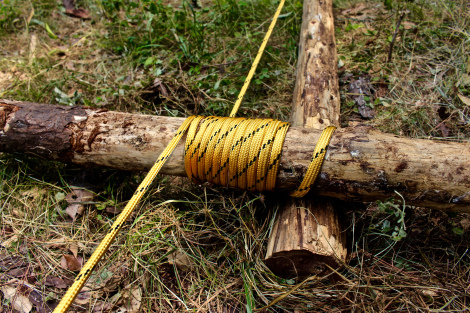
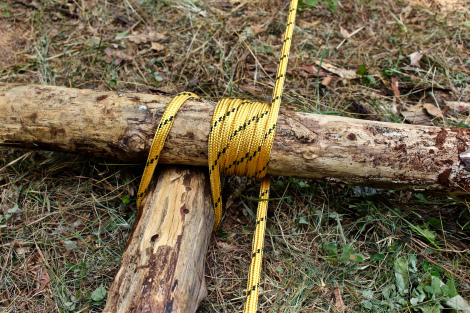
The rope spooling down the long end of the pulley pole (Rig 2).
Continue this of flip-flop action until the object is freed. Six full revolutions around the pulley is what it took to inch my truck up the incline to level ground in the video.
Flip-Flop Tips When Alone
If you practice the technique with rope coiling on the pulley pole on both sides of the lever, you’ll find that the pulley has a tendency to swing in towards the rope as tension increases. My fix was to drive two stakes on opposite sides of the rope where the pulley pole lands on each flop. If the ground is too hard for stakes, a heavy rock or object may prevent the slide. As mentioned above, a heavier pulley pole would decrease the chances of this happening.
Experimenting with the rope spooling on one side of the pulley pole remedied the torque issues. I recommend using this method (Rig 2) vs. the rope spooling on opposite sides of the lever pole (Rig 1).
Also, under tension, the lever pole can rise off the ground with either method. Attach a loop of cordage on the tow rope where the flipped lever lands. Slide the loop over the lever on each flip once a good amount of tension is present.

A Prussic Loop is a quick way to connect to the standing rope
Disconnecting the Rig
Obviously, once a vehicle is freed, the rope is no longer under tension. However, when pulling a tree or rock, tension can be released by reversing direction of the flip-flop. Once tension is removed, the spooled line can be handled safely.
Safety Concerns
There are inherent dangers when tension is applied to a rope or cable. If the rope has elasticity and snaps, the potential energy turns to kinetic energy moving like a slingshot or bow and arrow in opposite directions. Use rope without elasticity, nicks, abrasions, and a working load suitable for the task.
If you’re alone, you must cross over the rope in this process. Minimize the risk from flying rope by laying a heavy coat or blanket (if available) on the rope at both ends. With two people, nobody has to step over the taut line.

Another safety precaution is to wear leather gloves and eye protection. A smart thing to have handy is a knife handy to cut the rope if you somehow manage to get a hand pinched between the rope and pulley. Not sure how that might happen but better safe than sorry.
This powerful simple machine takes practice to perform properly. With a minimum of tools and some rope, the flip-flop winch can be a life saver on the homestead or in the backcountry. Add it to your preparedness toolbox. Give it a try and share your results.
Keep Doing the Stuff of Self-Reliance,
by Todd Walker
TRULY excellent stuff!!! I would like to see a re-do of the video (and the text) where you focus on rigging with all raps on one side of the pulley pole since, by your own admission, it is the better way. Perhaps a hand running the camera would be a good thing too ( and keeping the verbiage straight). Simple, but effective! This is definitely the right answer! Keep it up!