


This page has a lot of photos so give them a chance to load if you have a slow connection. This is worth the wait!
The homemade plant propagation system that you are about to see is extremely easy to build at home, and using it you can root cuttings of all kinds of plants like magic.
It’s fun to see how many different kinds of plants you can root using this simple technique. And since they don’t cost you anything, that makes it even better.
Let’s get started, Dana and I will show you how to build your very own Homemade Plant Propagation System…
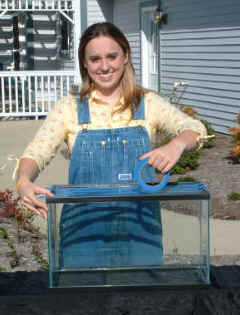
The very first thing that you need to purchase is a very inexpensive fish aquarium. The size doesn’t matter because you are going to build the rest of your homemade plant propagation system around the aquarium.
Don’t make it too large or it will be too heavy to lift and put into place. If you want to root a lot of cuttings you’re better building more than one of these plant propagation systems.
The aquarium that Dana is applying masking tape to in the above photo I picked up at the discount pet store for less than $10.00.
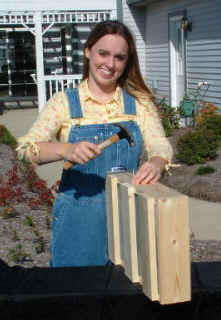
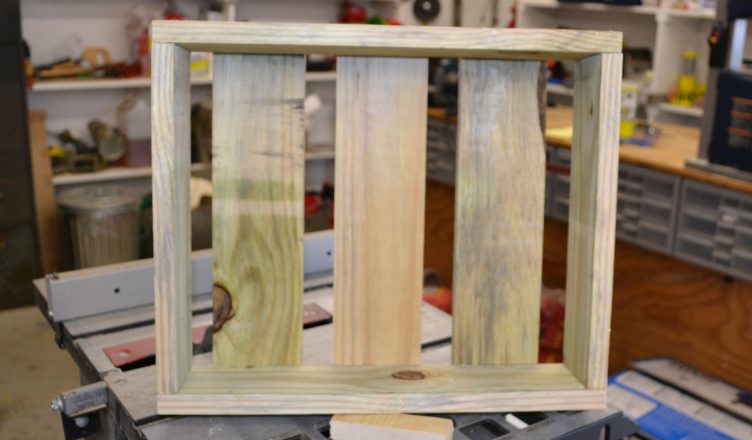
Once you have the fish aquarium you need to measure and obtain the outside dimensions of the top of the aquarium. Then, using 1″ by 4″ lumber, you need to construct a box, or a flat with an open bottom like the one Dana is working on in the above photo. Make the inside of your flat one inch larger than the aquarium in both directions.
In other words, if you measure across the top of your aquarium and find that the width is 9½”, make the width of your flat 10½” on the inside. If the length is 20″, make the length of your flat 21″ on the inside.
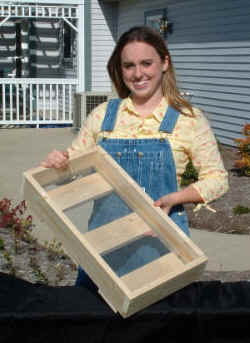
When your flat is complete you should be able to turn the aquarium upside down and place it inside the flat and have approximately ½” of space on all four sides.
Notice how simple the flat is to build? Just four pieces of wood to make the fours sides, and then three pieces across the bottom. Notice that there is small gap on each end of the bottom and two larger gaps in the middle. The size of these gaps doesn’t really matter, you just want to have openings so water can drain through.
It’s difficult to see in the above photo but if you look closely you can see that we have lined the bottom of the flat with a piece of rigid hardware cloth (screen).
Make sure the hardware cloth you use is quite rigid so it doesn’t sag below the gaps on the bottom when the flat is full of potting soil. If you go to a full service hardware store they’ll have what you need.
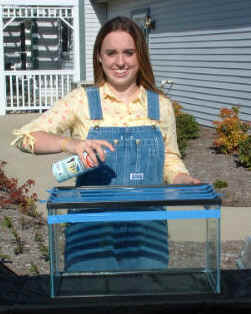
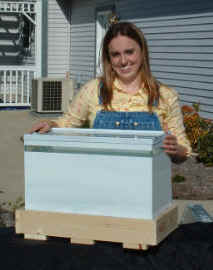
Now it’s time to paint the homemade plant propagation system. From now on the aquarium will be used upside down, so what was intended to be the bottom we are using as the top. Confusing I know, but the photos should help.
Notice how Dana has applied masking tape to the top of the aquarium? You’ll see in the next photo that she applied a strip of masking tape, left about a one inch gap, applied the next piece of tape, left another one inch gap and so on. In the above photo you can also see that she applied one piece of making tape all the way around the aquarium, about one inch from the top.
Once taped as shown here Dana will spray paint the entire aquarium with white paint. We use white paint to reflect the rays from the sun to keep our plant propagation system from getting too hot.
We apply the tape before spray painting, then as soon as we are done painting, even before the paint has a chance to dry, we pull the tape off exposing strips of clear glass, or plastic as the case may be.
These clear strips allow a small amount of sunlight to enter our plant propagation system while the painted areas block out the majority of the suns rays. This gives the cuttings the amount of sunlight they need, but keeps it from getting too hot inside.
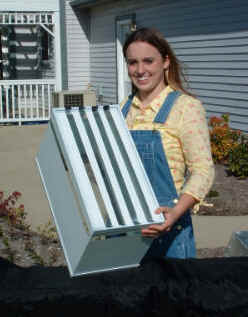
Make sure the paint you buy adheres to glass or plastic without special preparation.
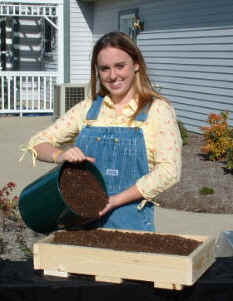
Now it’s time to fill the flat with potting soil. For rooting cuttings buy a bag of potting soil that contains as little nitrogen as possible. When you are trying to root cuttings you DO NOT want to encourage top growth. Just a good blend of potting soil that is light and contains some Perlite for drainage. If you don’t think the soil you purchased has enough, or any Perlite at all, you can always add some.
When rooting cuttings you want the soil to be moist but not wet and soggy. It’s kind of like baking a cake. Nobody likes a dry cake, but most people love a moist cake. But nobody would care to eat a wet or soggy cake. Your cuttings like their soil exactly the same way you like your cake!
Fill the flat completely with potting soil, press down on the soil, packing the center, the corners and the edges. You want the soil to be firmly packed into the flat.

Now it’s time to start filling your flat with cuttings. You might have to use something like a Philips screwdriver to poke holes in the potting soil so your cuttings slide in easily. As you stick the cuttings gently pack the soil around each cutting so they stand upright and any air pockets around the cuttings are pressed out.
Make sure you dip your cuttings in a rooting compound before you stick them. A rooting compound is not magic, and cuttings will root without it, but it greatly increases your success rate.
The brand of rooting compound you use doesn’t matter. Both liquids and powder rooting compounds have been proven to work equally well. But the strength of the rooting compound you use does vary depending on what time of year you are doing your cuttings.
If you are sticking cuttings in the late spring you should only be taking softwood cuttings, and the rooting compound should be on the weaker side. If you are doing hardwood cuttings in the fall or winter, the rooting compound should be stronger.
With powder rooting compounds you have to buy different strengths for different times of the year. But with most liquids you have to mix them with water and you adjust the strength that you need by adding more or less of the concentrate to the water.
Brand name doesn’t matter, they all do the same thing. If it sounds complicated don’t get nervous. The instructions are right on the bottle.
For everything you need to know about how to propagate what and when, visit this page: Plant propagation, the Basics. It’s loaded with great “how to” info that will help you, and it opens in a new window so you don’t lose this page.
Stick all of your cuttings at once so they don’t dry out as you are filling the flat. Once the flat is full, gently water the cuttings in, soaking the soil thoroughly. This also helps to eliminate any air pockets around the cuttings. You can stick the cuttings in the flat as close together as one inch. They really don’t need much room at all to root.

In this example Dana filled our flat quickly with both Variegated Weigela and PJM Rhododendron. But what’s really nice about this homemade plant propagation system is that you can experiment to your hearts content. Try a little bit of everything.
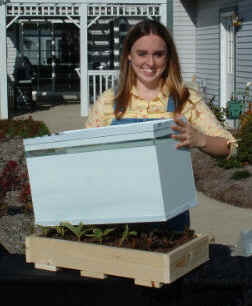
Once you have the flat full of cuttings, just place the aquarium over top of the flat, resting it on the potting soil in the flat. As you stick your cuttings you want to keep them at least ½” from the edge of the flat so there is room for the aquarium to rest on the potting soil, just inside of the flat.
That’s it! The only thing left for you to do is move your homemade plant propagation system to an area that is partially shaded and make sure the soil in the flat doesn’t dry out. You’ll be able to tell how moist the soil is just by the amount of condensation on the inside of the aquarium. Check the soil for moisture every day until you can gauge how often it needs additional water.
You’ll be amazed at the different kinds of plants that you can root using this system, and you’ll be amazed at the different things that you can be doing at different times of the year.
You can do hardwood cuttings all winter long, and once you have your flat filled with hardwood cuttings you can move it outside, even if you live in a cold climate. Hardwood cuttings are are tough and they don’t mind the cold and freezing weather at all. Just make sure the medium remains moist all winter.
You can learn a lot about plant propagation at home on this page: Plant propagation, the Basics.
You can also increase your chances of success with certain types of hardwood cuttings by installing a heating cable in the flat under the potting soil. See this page on: Bottom Heat.
You can also start seeds of all kinds of plants in your homemade plant propagation system. Things like Dogwood seeds, Japanese Red Maple Seeds and many more. Your options are endless! Have a blast and do a lot of experimenting.

source : Mike McGroarty