


Two years ago, we moved into a house that had an abandoned garden; and to put it bluntly, the garden was in pretty bad shape. The soil was dry, rocky and compacted and there were weeds growing, but I was able to turn it around by conditioning the soil and experimented using a cardboard box gardening theory I was trying out. Since that time, I have added rabbits to our mini homestead and their nutrient-rich poo has turned my garden’s soil into that crumbly, rich dirt we all desperately want. Even though this garden is primed and ready to go, it just isn’t large enough for what I am trying to achieve.
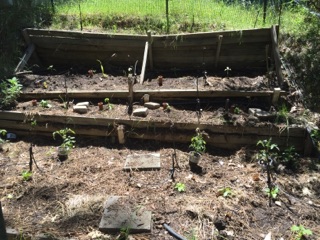
This old garden bed has seen better days. Not only is it falling apart, but it doesn’t give me the right space for what I want to achieve.
For years, I have been working on backyard strategies that anyone can use to achieve food freedom to finally break away from the system and my family’s dependence on grocery stores. We have been able to find local meat sources, now it’s time to get enough produce to put away.
Why Straw Bale Gardening Works!
I decided to try my hand at straw bale gardening. It sounded practical enough. In fact, author, Joel Karsten of Straw Bale Gardens Complete, wrote on his website that this gardening method is a game changer. “Minimal maintenance resulting in maximum production, through Straw Bale Gardening. It will completely change everything you thought you already knew about gardening.”
As well, this raised bed gardening method is very economical. For under $100, we were able to purchase 12 straw bales and extended our garden area by over 20 feet! We also purchased about $30 in organic fertilizers to condition the bales, but if you have the gift of time on your hands, you can bypass this step completely. I’ll get to that a little later.
Not only was I was drawn to this gardening method because it was cheaper, but it was easy for those with physical limitations and took poor soil quality out of the gardening equation. As well, I love natural gardening methods and liked the idea of the bales decomposing as the plants were growing, thus giving them essential nutrients in the process.
This auto-pilot garden needs no watering,no digging and no pesticides!Learn more HERE.
How it works
In short, as the bale of straw decomposes, it creates a nutrient-rich medium for the plants to grow. As well, the space between the straw creates tiny air pockets that are beneficial to the roots.
The bales need to be “conditioned” at least two weeks before planting. This will create the right growing environment for your plants. Once the bales are conditioned, you plant your garden and sit back and enjoy the view. It’s that easy, folks!
What you’ll need
- straw bales
- cardboard, newspapers or landscaping cloth
- soaker hoses
- garden stakes for trellises for tomatoes
- 2 boxes each of organic blood meal and bone meal
- Getting started is easy! All you need to do is choose the area where you want to start your straw bale garden project. Make sure the location will get ample sunlight – up to 6 to 8 hours a day. Next, set down landscaping fabric, newspaper or cardboard boxes to prevent weeds from growing through the bales. Don’t skip this step – it’s important!
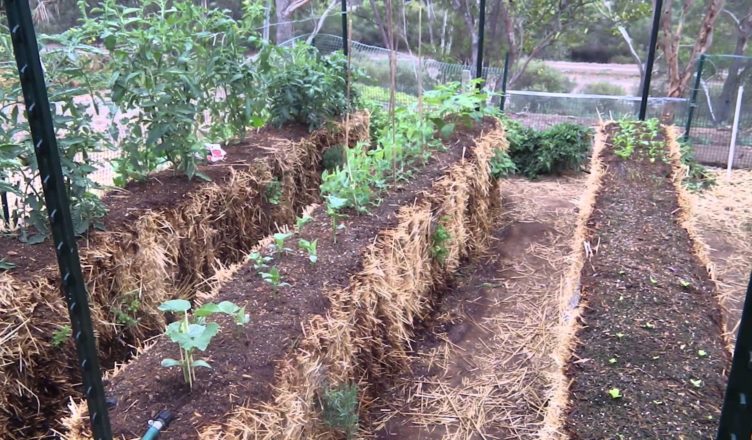
- Position your bales. Once you have set down the landscaping fabric into an outline you want the bales to go in, start positioning your bales so that the strings that bind the bales should run across the sides, not across the planting surface. By positioning them this way, it will keep the shape of the bales as they start to soften and decompose.
- Water your bales and get them ready for conditioning.
- Condition bales.
- Plant garden and fertilize as needed.
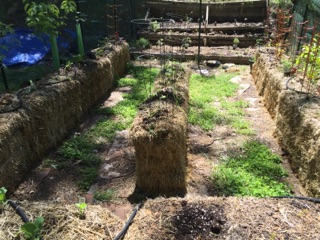
After positioning the straw bales into the shape I wanted, I was surprised at how much extra space I had in the garden.
How to conditioning straw bales
Like all gardens, before you plant your plants, you need to make sure they will have the right environment to grow in. Conditioning will help activate bacteria inside the bale to begin digesting the straw. It will make nitrogen and other nutrients available to the seedlings and create a productive, warm, moist and nutrient-rich rooting environment for young seedlings. This is an ideal environment for beneficial insects including earthworms. As well, the bales will last you for up to two garden seasons because it slowly breaks down. Once it is completely broken down, you can throw it in your compost pile and turn it into rich compost.
You will see a difference in the bales overall appearance after it has been conditioned. It begins to slump and the color of the straw will start to “pepper.” In addition, the internal temperature of the straw bale increased too. If you insert a thermometer, it may rise to 120 degrees or even higher. I knew when my bales were properly conditioned when I saw earthworms living in the bales when I was planting the plants.
There are two processes for getting the straw bales conditioned and which one you use is dependent on how much time you have. Conditioning the bales will take two weeks or more to get the decomposition process started.
If you’ve got plenty of time, use this method:
After you have added the landscaping cloth and positioned your bales, simply add some top soil, fresh manure and all-purpose fertilizer to the tops of the straw bales, water thoroughly and allow this to sit uncovered for a few months. Many people who use this method will position their bales in the fall and allow them to decompose over the winter so they are ready for spring gardening.
If you are short on time, use this method:
This is a quick way to get your bales decomposition process going. For ten days, you will be watering and fertilizing your bales to get the inner straw composting.
Days 1-6: For the first six days, you will be adding 3 cups of organic fertilizer per bale every other day. Then, thoroughly saturate the bales with water so that the fertilizer is pushed down through the straw. I used an organic fertilizer that was high in nitrogen like a 12-0-0 blood meal. On the off days, simply water the bales. To make the fertilizer more available to the bacteria more quickly, I use a tent stake and hammered holes in the straw bales before adding the fertilizer. This really seemed to speed up the process.
Avoid using manures for the “quick cook” method because most manures do not have enough concentration of active nitrogen. The only exception to this is pure chicken manure that has been composted for 6-12 weeks and does not have any bedding or wood shavings mixed in. Read more about why manures won’t work with conditioning.
Days 7-9: For two days, I added 1 cup of an all-purpose organic fertilizer and thoroughly watered the bales. By now, you should start seeing some significant changes to your bales.
Day 10: On the last day, I added 3 cups of bone meal. This fertilizer is high in phosphorus and potassium and is great for making sure there are nutrients present for essential root development.
Planting time
After your bales have properly cooked down, now is the fun part and what you have been waiting so patiently for – planting time! Use a gardening trowel to remove the straw in the shape of a hole. You can also help any exposed roots, by adding some sterile planting mix to the hole.
If you’re planting seeds, then cover the bales with a one to two-inch layer of planting mix and sow the seeds directly into the planting mix. As the seeds germinate, they’ll grow roots down into the bale itself.
Suggested number of plants per bale
- 2-3 tomatoes
- 4-6 cucumbers
- 2 pumpkins
- 2-3 zucchini
- 2-4 squash
- 4 peppers
- 2 winter squash
Tomatoes and cucumbers are very thirsty plants, so make sure you have a way deeply irrigate these plants. I added soaker hoses to my bales and also added these ceramic water irrigation stakes.
Don’t limit your straw bale garden to just vegetables. You can use every inch of free space and plant flowers and herbs in the bale to attract bees and other pollinators. I even added strawberry plants to the sides of the bales that were going unused.

Continue to fertilize
Straw bales do not offer all the essential nutrients like soil does and plants may need extra fertilizing. Here are some indicators to look for:
- yellowing leaves – nitrogen deficiency
- leaves are browning on edges – potassium deficiency.
- leaves turning purple – potassium deficiency
I am very hopeful that this garden method will be a good fit for me and I am pleased with how easily this addition to my garden was. I will keep you all updated on the progress and hopefully, I can give a good report back with a great summer bounty.
Happy gardening!
source : Tess Pennington
This is one of the best written instructions of any garden method I have read in along time. Thank you. Saving,
I live in Temecula and would love to visit sometime. I plan on starting in a couple weeks Feb 15, 2022. This instructional was fantastic! Wonderful job. Looking forward to my new garden now.