


Storing food is more important than ever, but these days we can’t always rely on purchasing food from the grocery store. Canning is awesome, but have you added dehydration to your repertoire yet? Dehydrating food is a great way to store a lot of nutrients in a small space, especially if you use some of the tips in this article to get the most bang for your storage buck.
There are many different ways to dehydrate food. There are minor differences between dehydration and drying. Dehydration uses artificial means to remove moisture, whereas drying uses natural means. The end result is the same, and for the purpose of this article, we’re going to use the terms interchangeably.
- Use a dehydrator. These can range from inexpensive and simple to all the bells and whistles. I recently got this smaller one for my city apartment, and I’m very happy with it. I find that silicone tray liners make my life far easier at clean-up time.
- Use your oven. Set your oven at 145 °F for fruits and veggies and 150 °F for meat jerky.
- Air dry. I use this method for lightweight items like herbs and spices from my garden. I change them in a sunny window in a room without a great deal of humidity. If you are drying outdoors or there are pesky bugs or birds around, you can get a mesh hanging contraption to dry your herbs and keep them pest-free. These remind me a lot of those clothing sorters that hang in the closet that you get for little kids to organize their wardrobes for the school week. You could probably use those, too.
- Sun dry. Much like air drying, you’ll want to protect your food from pests. You can use a piece of light screen for this. Turn your food over halfway through the drying process. Some folks put trays of food they want to sun dry in a hot car for the day.
The method you choose for dehydrating food will vary based on your resources, what you’re drying, and the tools you have available. I recommend you know how to both dry and dehydrate food so you can put things back regardless of your situation.
How do you dehydrate different foods?
The process you use depends a lot on what you’re drying.
Herbs: I like to air dry my herbs. I made a hanging rack out of a small pot rack, but you can also use an existing curtain rod and tie your herbs to it. You just want to make sure the air can circulate all the way around your herbs.
Mushrooms: Wash your mushrooms really well to get all the dirt off. Pat them dry, then slice them thinly. I like to dehydrate mushrooms for a longer time at a lower temperature for the best results. Make sure they’re thoroughly dry before storing them away. If you’ve ever thought about growing your own mushrooms, check out our course here.
Veggies: Most veggies fare better in the dehydrator if you prep them by blanching first. Veggies that don’t require blanching are lighter, like slices of zucchini or greens.
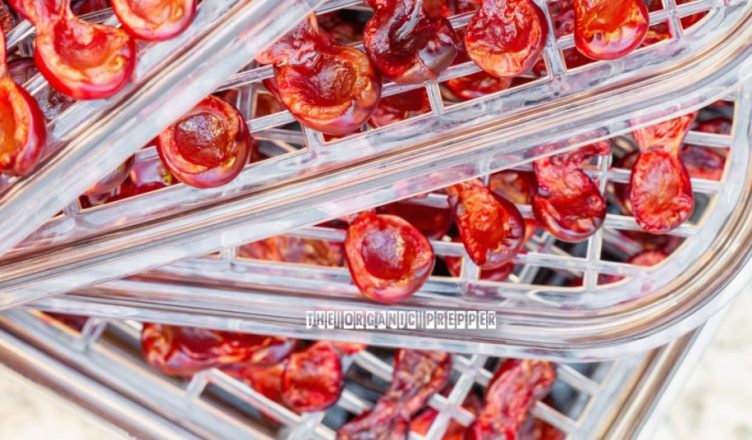
Fruit: I use the dehydrator or the sun for fruit. Slice it thin and evenly and let it get completely dry. If you can squeeze it and feel moisture, it’s not done yet.
Meat: Use meat with as little fat as possible. You can even use leftover meat for this. Thinly slice it and put it in the dehydrator or the oven until all the moisture is removed. Jose wrote about his experiment drying meat without a dehydrator here.
Warnings about dehydrating food
I warn about botulism a lot when writing about canning, but it’s also a valid concern with dehydration. Botulism thrives in a moist, oxygen-free environment. Therefore, I absolutely NEVER store my dehydrated foods with oxygen absorbers.
I might go a little overboard on the level of dryness because I want to be sure there’s no moisture whatsoever in my food. After you dehydrate, put your food in a jar. Then place the lid on it extremely loosely. Shake the contents every day to make sure you’re allowing the last little bits of moisture to leave before closing the jar. If you see moisture building up inside the jar, your contents are not thoroughly dry and need to be processed further. I’m not sure if this is named appropriately, but I call this air-curing.
Fruit and veggie powders
I don’t have tons of space in my urban apartment, so I store a lot of my dehydrated foods as powders. Here’s how I make them:
Once my dehydration process is complete, and I’ve air-cured the product in a jar, I use my handy-dandy food processor to turn the food into a powder. (Don’t be put off by the low price of this little device. I’ve had mine for years and use it regularly.)
When putting the powder into the jar, I use a fine mesh strainer to get any “chunks” out. Then the chunks go back into the food processor until everything has been zapped into a delicious, nutritious, magical powder.
The benefits of storing produce as a powder are many:
- You can easily add a boost of vitamins to any soup or sauce by putting in a scoop of carrot powder, beet powder, mushroom powder, or green powder.
- It takes up very little space to store the same amount of nutrients.
- You can add fruit powder to smoothies and yogurt.
- You can combine multiple fruits together or multiple veggies together.
- These powders add loads of concentrated flavor to your foods.
Be sure to label your powders. You may think that you’ll remember what they are based on color. I learned the hard way (tomatoes in your berry smoothie, anyone?) that it isn’t always that easy.

Is dehydrating food part of your storage plan?
Do you dehydrate or dry foods for your stockpile? What method do you use? Do you have any additional tips to add regarding dehydrating food?
source : Daidy Luther