


There is nothing quite like using a bow and drill to make your very own fire completely from scratch! Of the many ways to make primitive-style friction fires, the bow and drill is one of the most practical methods to learn. The technique works well in nearly all environments across the globe.
Here are guidelines to help you make your own friction fire kit:
Wood Selection
The first and most important step in making an effective friction fire kit is proper wood selection. Dead, dry wood of medium-soft density is needed for a bow and drill kit. Look for dead branches on trees in your area. The following tree species can provide good material of the correct density:
- Cedar
- Cottonwood
- Willow
- Basswood
- Juniper
- Aspen
- Poplar
- Buckeye
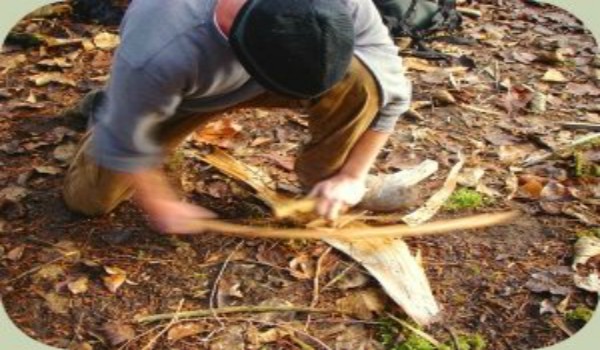
Collect a couple branches that are at least wrist-thick and two feet long. You can also start with lumber, rather than harvested materials. It can be easier to learn with lumber, as less carving is needed for construction. An eight foot clear cedar one by four provides ample material.

How to Create the Bow and Drill Kit
There are several parts in a bow and drill kit. Each of the different parts are explained below:
The Fireboard
The
fireboard is the bottom piece where a coal is formed. Start with one of
your branches or boards and cut off a 12 inch long piece. Split and
whittle it down to a board shape that is 12 inches long, about two to
four inches wide, and one inch deep. Make sure the bottom is flat.
The Drill
This
small upright piece spins on top of the fireboard, creating friction
and heat. Cut off an eight inch long section of branch or board. Split
and/or carve it down to a dowel shape with a one inch diameter. The top
end is then carved down to a tapered point, like a pencil. The bottom
end is then carved down to a blunt point.
The Handhold
The
handhold is the piece that goes on top of the drill, which allows you
to apply downward pressure onto the drill and fireboard. Use another
piece of wood and carve it down to about the size of a full bar of soap.
Round the edges so that it is comfortable to hold. On the bottom, carve
in a socket that will fit the top of the drill, about a half inch deep.
The handhold socket and the top of the drill should be lubricated. You
can use soap, wax, waxy vegetation (such as hemlock tree needles), or
almost any other type of lubricant. Be careful not to lubricate the
bottom of the drill or fireboard.
The Bow and Bowstring
As a primary component of the kit, the bow is used to rotate the drill back and forth. Find a sturdy, lightweight, gently curving branch that is approximately as long as your arm with a one to two inch diameter. This makes a good bow. A six foot length of very strong cordage is needed for the bowstring. Parachute cord or quarter inch diameter nylon rope are good choices.
Traditionally, cordage was made out of local plant materials such as dogbane and nettle. With practice, even rootlets and tree barks can be turned into effective cordage for a bowstring. Tie the bowstring on with a permanent knot on one end of your bow, while leaving the other end of it tied with an adjustable knot. This will allow you to adjust it when necessary.

The Coal Catcher
This
is a small, flat piece of material which will catch and collect the
dust that will be formed by the drill and fireboard. A thin, flat piece
of bark, a stiff plant leaf, or a small piece of paper can work as a
coal catcher. It is placed directly under the notch you will cut into
the fireboard.
Tinder Bundle
This is a ball of dry, fluffy, flammable materials such as shredded cedar bark, cattail down, fireweed seed fluff or similar materials. You can pull apart jute twine (sold at hardware stores) for a quick tinder bundle. You’ll need about a softball-sized amount of tinder to use for igniting the coal produced by the bow and drill kit.
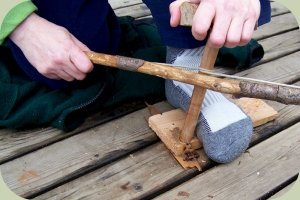
Using the Bow and Drill Kit
Now that you have created the basic parts of the bow and drill kit, its time to put them together and learn how to use them as one unit. Correct body posture and form are very important in order to create a fire with the bow and drill kit. The following steps illustrate key points:
Step 1
Carve in a small starter hole into the top of the fireboard, about one inch from the edge of the fireboard, to fit the bottom of the drill. Now you can wrap the drill into the bowstring so that the string wraps around the drill once, very tightly. It should be somewhat difficult to twist the drill into place. Now place the bottom of the drill into the fireboard starter hole and put the handhold onto the top of the drill. Keep the drill straight upright, perpendicular to the ground.
Step 2
If you are right handed, put your left foot on the fireboard (use your other foot if you are left handed), close to the place where the drill will spin. Then, place your left hand on the handhold so that your wrist is tight against your shin. This will help you keep the drill steadier as it spins, and allow for more even downward pressure. Move your right leg back behind you so your knee rests on the ground. This will create space for bowing and help stabilize your position. Now, you can grasp the bow with your right hand start moving the bow slowly back and forth. Take it slow at first and gradually increase speed. Keep going for a little while, until you see smoke coming from where the drill and fireboard meet, then stop.
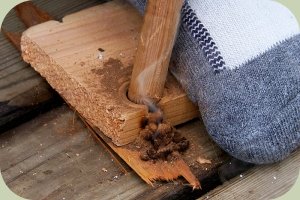
Step 3
Take the drill off the fireboard and out of the handhold. Carve a pie-slice-shaped notch into the fireboard where the drill is rotating on the fireboard. This notch should form a little wedge that is broadest at the edge of the board and sharply tapers to a point just short of the center of the socket you just burned into the board. This will allow the fine wood dust to collect into a pile. This is where the coal will form. Make sure you have the coal catcher positioned right under this notch so that the dust will collect on it. That way you can move the coal into the tinder bundle with ease.
Step 4
Now you can return to bowing. Again, start off
moving the bow in slow, smooth and flowing movements keeping it parallel
to the ground. Keep moving the bow in a steady rhythmic flowing motion,
speeding up as you go. Once you start seeing a lot of smoke, you can
start speeding up even faster and applying more downward pressure with
your handhold. As it starts to smoke a lot you might be tempted to stop.
Keep going! Keep going until you get tired and have to stop. Check the
darkness of your dust, the darker the better! You need to look closely
now, and see if the little dust pile is making smoke on its own. If you
see smoke coming from your dark dust pile, you likely have a coal.
Step 5
Let the coal sit there and burn a little bit until you can see the tiny orange glow of the coal growing. Now you can carefully move the coal in its dust bed and transfer it to the center of the tinder bundle. Shape the tinder bundle into a nest shape and partially enclose the coal. Then gently and steadily blow on the coal, until it bursts into flames.
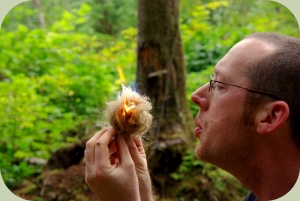
Fire!!!…
Now you can build your fire by nestling the burning tinder bundle into a well made tipi of woody materials. It is best if they are stacked so that the finest materials are on the inside, and the wood pieces are progressively larger as you go out. Now you’ve done it! You made a primitive friction fire with a bow and drill!

source : Filip Tkaczyk