


A good survival kit always has a compass in it, but that doesn’t mean that you can’t find yourself lost in the wild without any way  of gauging your direction. Being able to navigate without a map and compass is not only an integral skill to the survivalist, but an ancient art. With some knowledge and practice, one can use any of these simple tricks to align themselves on Earth via the celestial bodies in the sky above.
The first of two solid methods using the sun requires a traditional, hour hand style wristwatch. But not everyone wears an hour hand style wristwatch anymore.
By Joshua Valentine, a contributing author to SHTFBlog and Survival Cache
Using the Sun
 If your watch is digital, this method will still work accurately by simply imagining the hands and numbers on the watch’s face, or even drawing the watch face and correct time on a piece of paper. It is important, however, that you know the local time correctly. In the summer, typically March through November, you must also adjust for daylight savings by moving the hour hand back one hour before taking your bearing. Also, the closer one is to the Equator, with the sun directly overhead, the less reliable this method becomes to use.
The Watch Method
1. In the Northern Hemisphere, take your wristwatch, and, holding it parallel to the ground and as level as possible, point the hour hand at the sun.
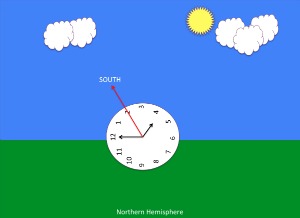
2. Next, draw an imaginary line that bisects the distance between the hour hand and the 12. This will form your north-south axis, with the direction pointing away from you being south. To clarify, if the hour hand is on 4:00, then 2:00 will be pointing south. It often helps to align this axis with a landmark right away.
3. The reason the angle is halved is because it takes the hour hand two full rotations to cover the 24-hour period it takes the earth to travel around the sun.
4. It may also help to remember that the sun is due south at noon. Therefore, it is in the east before noon, and in the west past noon.
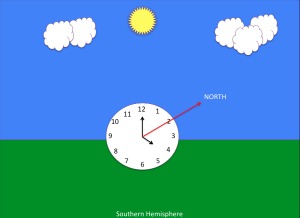
5. This method also works in the Southern Hemisphere, with some slight modifications. In the Southern Hemisphere, point the 12 at the sun rather than the hour hand. Once more, draw an imaginary line that bisects the distance between the 12 and the hour hand to find your north-south axis. This time, the direction of the line that is pointing away from you will be pointing north.
The Shadow Stick Method
The second trick is a bit simpler, as it does not require you to know the local time. It works the same in either hemisphere, and can be performed with just a stick. Opposite of the watch method, this one can be used near the equator, and becomes less reliable the further one is from the equator. Like the watch method, it is not so accurate that one could use it to plot coordinates, but it is very useful in establishing a general sense of the cardinal directions.
1. Begin by finding a stick, ideally about three feet in length and as straight as 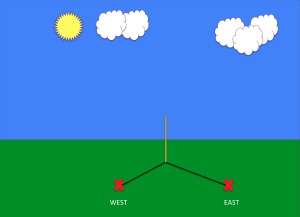 absolutely possible. Find an open clearing with adequate sunshine, and plant the stick in the ground, standing straight up. The stick will immediately cast a shadow.
2. Mark the very tip of that shadow with a rock, another stick, anything that you have handy that will be easy for you to distinguish as your mark from the rest of the terrain. Your first marker will always represent west.
3. Now, wait twenty minutes. As the sun moves across the sky from east to west, the stick’s shadow will in turn begin to move 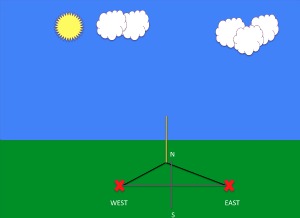 from west to east. After twenty minutes has passed, mark the tip of the shadow again with a second marker.
4. The line formed by your two markers represents the east-west axis. From there, you can establish north and south as well. By aligning these with a landmark, you now have a heading to travel. A rule of thumb is the longer you wait, the more accurate your axis will be, and if you have the time to wait an hour, you will get the most accurate heading.
Using the Stars
At night, one can locate North or South using the constellations, and even the moon. In the Northern Hemisphere, the celestial body marking the North Pole is known as Polaris, or the North Star. Polaris sits above the North Pole with the earth’s axis pointed almost directly at it, and remains there consistently throughout the year, while all the other constellations appear to rotate around it. Polaris is actually the very last star on the handle of the Little Dipper, which sounds easy enough to find. However, the Little Dipper is not always visible. The easiest way to find Polaris is to use the pointer stars on the Big Dipper, also called the Plough.
Also Read: Why Learn to Read a Map
The last two stars in the constellation appear as the end of the Big Dipper’s cup. These are the pointer stars. Drawing an imaginary 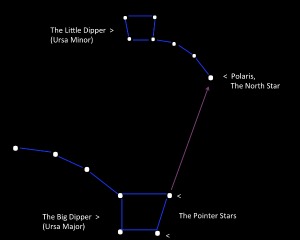 line upwards from these two stars will line you up with Polaris at the end of the Little Dipper’s handle.
Alternatively, one could use the constellation Cassiopeia to locate Polaris. Cassiopeia is a five star constellation in the shape of a W or an M, depending on the time of year. Drawing a line directly from the midpoint of Cassiopeia’s wider V will lead one directly to Polaris.
In the Southern Hemisphere, where the North Star is not visible, one must instead establish south by finding the constellation known as the Southern Cross, or the Crux. The Southern Cross is a constellation of four stars, often located by first finding the two pointer stars near by. There are two methods of finding south using these two clusters of stars.
1. From the main axis of the cross, draw an imaginary line in the direction of its brightest star four and a half times the length of 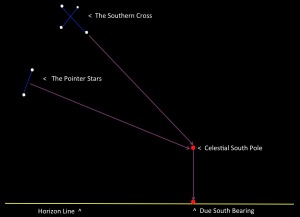 the cross’ main axis. This imaginary point is your marker for the South Pole, the point around which the stars turn in the night sky. From this point, extend a line straight down to the horizon to mark south.
2. You can also use the Southern Cross’ two pointer stars to establish south. To do so, draw a straight, imaginary line between the two pointer stars. Do this same thing between the two most widely spaced stars in the cross. The point where these two lines meet marks the South Pole. From here, once again draw an imaginary line down to the horizon to mark south.
Using the Moon
Like the sun, the moon also travels across the sky from east to west, and can be used to establish direction as well. Unlike the sun, 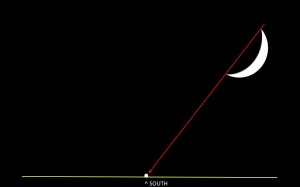 however, it takes significantly longer to make its journey, and thus is not as simple to use. Still, with practice, the moon can be useful to establish one’s general direction.
Also Read: Compass vs. GPS
This is most easily done when the moon has waned significantly, and appears in the sky as a crescent moon. By drawing a strait line between the moon’s two points and down to the horizon, one can establish south. Alternatively, if the moon rises before the sun has set, the illuminated side will face east. If the moon rises after midnight, the illuminated side faces west.
Pacing
Another important navigational trick to use is pacing. Pacing will allow you to determine the amount of distance you have covered. In order to properly pace, one must first establish their pace count. This is something best done and memorized before you find yourself in a survival situation, not after.
To do this, measure and mark a distance of exactly 100 meters (about 329 feet). Next, walk the distance from one mark to the other, counting each step. It may be helpful to do this a few times. The number you come up with most consistently will be your pace count. You can use this to measure distance over land, to give yourself a general idea of how much ground you have covered in that particular direction. Each time you have hit the number of your pace count, you have gone 100 meters.
Also Read: Azimuth – From Map to Compass
Should you encounter an obstacle that blocks your direct path, stop on the count before the obstacle and hold that number. Move directly right or left until you are no longer obstructed by the obstacle, then move forward counting your paces until you have passed it. Stop once you have cleared it, and move directly sideways back onto your original trajectory, then continue forward with your count.

It is important to keep some sort of marker to keep track of your distance. DO NOT attempt to do so from memory, this will only leave you open to second-guessing, more confusion, and potentially getting off track. Some put a small pebble in their pocket every 100 meters. I prefer to make a small knot in a piece of paracord. Whatever method you choose, it must be surefire way to help you keep track. It is also important to remember that one’s pace count increases as you travel uphill, and decreases as you travel downhill. Counting and practicing each will give you a more accurate method of gauging distance over varying terrain.
Also Read: Death By GPS
Though not difficult as concepts, all of these methods require practice to be able to be used accurately and comfortably. Taking the time to master them is integral to the tool kit of any survivor, and can make the difference should one find themselves trapped in a true survival scenario.
About Joshua Valentine: A lifelong outdoors and survival expert, Josh combines years of backcountry experience with a lifetime of unique and inventive fitness training, designed to prepare the body and mind for the rigors of the wilderness. Josh holds certifications as a Wilderness First Responder (WFR), American Canoe Association Whitewater Raft Guide (ACA), and Personal Trainer (AFAA). He is also a recorded Adirondack 46’r and White Mountain 4,000 Footer.
