


Survival water purification is one of the most important wilderness skills that we teach at Alderleaf. Water makes up more than two thirds of the average person’s body weight. It is a vital component of our physiology and even a small amount of water deprivation (also known as dehydration) can be harmful.
Unfortunately, not all water sources are created equal. Lakes, rivers and streams can harbor parasites, bacteria and many other harmful pathogens. Agricultural and industrial contaminants can also cause serious health problems and are unfortunately found in more and more water systems worldwide.

Most people reading this article probably have access to clean, abundant drinking water in the form of faucets, bottled beverages and other forms of infrastructure dependent technologies. What would happen to you if you were put into a situation in which could no longer depend on them? Being well versed in survival water purification allows you to find and produce clean, healthy drinking water in a variety of different environments and situations. It can literally save your life.
Water Sources
Within the context of survival water purification, we can divide water sources into three broad categories: surface water, ground water and atmospheric water. Surface water includes rivers, streams, lakes, oceans and any other water that is in contact with the ground and exposed to the air for long periods of time. Ground water includes springs, seeps and underground aquifers. Atmospheric water includes dew, mist, clouds, and all forms of precipitation (rain, snow, hail etc.). In a potential survival situation, you may have access to all of these sources or to only one or two of them.
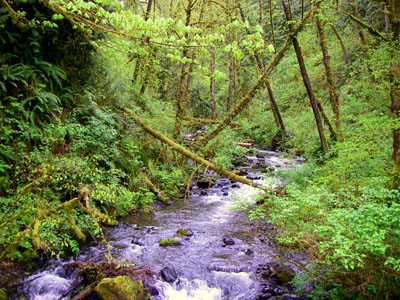
• Surface water sources are the most likely to be contaminated and unsafe to drink. This is due to the fact that surface water generally has no protection from its local environment.
• Ground water sources are generally safe to drink. Usually they are created by water filtering through lots of rocks and soil. Ground water is also the hardest to access. You have to find a place where it comes up to the surface (a spring) and drink from there.
• Atmospheric water sources are also generally safe to drink. When water evaporates from surface sources into the atmosphere it leaves behind all of the potential contaminants it may have had. Atmospheric water can be accessed as captured precipitation or as dew found on the leaves of plants or other clean surfaces.
Contaminants
What makes water unsafe to drink? By far the most common way water is rendered unsafe to drink is through fecal contamination. Feces (from humans and other animals) can carry many types of harmful bacteria and parasites that use water as a transmission vector.
• Protozoan parasites such as Cryptosporidium and Giardia are microscopic creatures that use other animals to complete their reproductive life cycle. They can be found in many waterways across the world and they are most frequently spread by humans, though beavers, domestic cattle and deer (among other animals) can also transmit the disease. They live in the intestines and cause severe stomach cramps, gas and diarrhea lasting anywhere from 2-6 weeks. Symptoms can appear in as little as two days or as long as two weeks after drinking contaminated water.
• Escherichia coli, also known as E. Coli, is another common fecal denizen. It cannot survive very long outside of a host animal so it is only present in recently contaminated water. E. Coli is a normal part of our gut flora and helps us to digest food. However, some strains can cause food poisoning if introduced into the upper digestive tract through contaminated water consumption.
Other forms of contamination include agricultural run-off, heavy metals and radiation. These tend to be less common in the wilderness. They are mostly found in urban waterways or near industrial plants. Most survival water purification techniques that can be performed in the field cannot remove these forms of contamination from drinking water. There are, however, a wide variety of ways that biological contaminants can be removed.
Commercial Water Filters
These can be purchased at any outdoor/camping gear store. They use micro filter technology and activated charcoal to remove biological contaminants. Some models use a hand pump to force water through the filter, others use the force of gravity, and some use the suction power of a person drinking straight through the filter. Each method has its merits and flaws. It is important to familiarize yourself with all of the survival gear that you will be using in the field before you go out and use it. Make sure you know how to properly assemble your filter and follow all of the manufacturer instructions that come with it. Before each use, inspect the filter for damage or leaks. All it takes is one contaminated drop of water to make you sick.
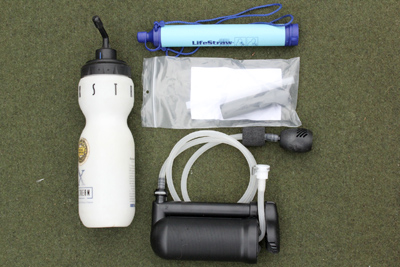
Commericial UV Treatment
In the last decade, several companies have produced UV (ultra-violet) light water purifiers. These devices are about the size of a marker or pen and contain a powerful UV light emitter on one end. High intensity UV light kills most microbes fairly quickly. The downside of UV light purifiers is that their efficacy drops dramatically if the water is cloudy or brackish. They also require batteries or some other electrical power source, but for short term trips into the backcountry they provide a lightweight, compact survival water purification solution.
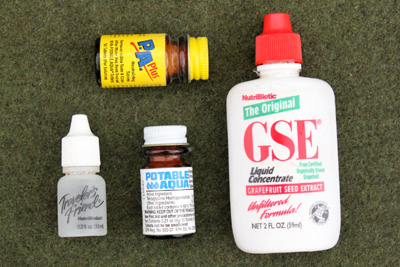
Chemical Water Treatments
These can also be found at any outdoor/camping gear store and many large supermarkets. Chemical treatments contain antimicrobial substances such as iodine, chlorine or grape seed extract that are introduced to water to make it drinkable. Always follow manufacturer instructions when using chemical water treatments. They generally require at least 30-45 minutes to render water safe to drink. Chemical treatments are by far the lightest tool to use for survival water purification, but any water treated with them tends to taste pretty terrible.
Improvised Chemical Treatments
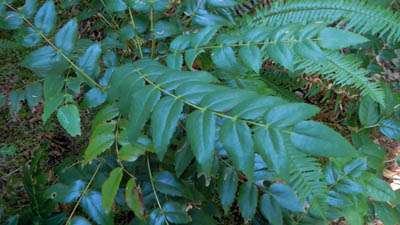
In an emergency, you can use naturally occurring antimicrobial plant alkaloids to chemically treat your water. The efficacy of improvised chemical treatments for water is far less reliable than a commercial chemical treatment. Use this technique only in an emergency! Oregon Grape (Mahonia aquifolium) is a common understory shrub in the pacific northwest.

The bright yellow inner bark of the root contains a powerful antimicrobial alkaloid called berberine. You can chew on the root before and after drinking questionable water as a form of ‘herbal’ water treatment. The root is very bitter and far too tough to swallow.

Boiling
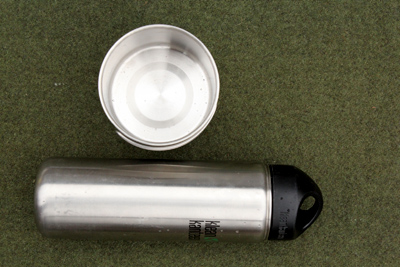
The oldest and most reliable method of survival water purification is the application of heat. Water boils at 212 °F (100 °C) which is hot enough to kill or deactivate Giardia, Cryptosporidium, and E. Coli. The quickest and easiest way to accomplish this in the field is to use a metal canteen or cooking pot and a source of fire. Any metal container can be used in a pinch, even soda or soup cans, though you should avoid long term use since both of these containers are not designed to be heated repeatedly.
Improvised Boiling
What if you don’t have a metal container? Like all wilderness skills, survival water purification requires a certain amount of creativity. You can make your own container for boiling water out of wood using nothing but fire.
1. Find a large piece of wood. You want it to be fairly wide and deep to hold a decent amount of water.
2. Build and start a fire.
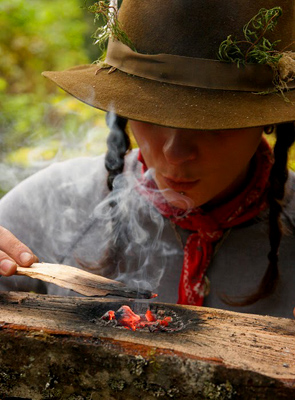
3. Once the fire has produced some decent glowing coals, you can carefully pull out a few and place them on the center of one side of your piece of wood.
4. Blow downwards onto the coal to transfer heat into the wood. After a while the wood will start to char and smolder.
5. Once you have a good sized area of the wood blackened you can take a rock, stick or other improvised tool and use it scrape away the brittle black char.
6. Repeat steps 3-5 on the same area and you will start to produce a deep cavity or burn bowl in the wood.
You should be careful not to burn too close to the sides or edge of the wood as this tends to produce cracks, which make for a leaky container. You can control this by smearing mud around the ‘walls’ of your bowl to prevent them from burning.
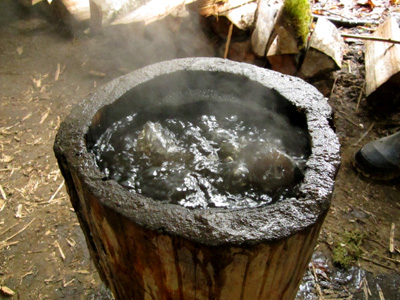
Once you have a good sized burn bowl, fill it with water. Obviously you cannot simply place a wooden bowl directly on a fire like a metal container for the purpose of survival water purification. To transfer heat into the water you will have to use a method called rock boiling, an ancient method of survival water purification once used by indigenous cultures around the world.
1. Heat up golf-ball-sized stones in the coals of a large fire until they are glowing red hot (this can take an hour or more). Avoid using stones from bodies of water, small amounts of water trapped in the rock can superheat into steam and cause the stone to crack or explode.
2. Carefully remove one stone from the fire. Quickly dunk the stone into a water source (does not have to be clean) to remove any excess ash (ash and water mixed together creates lye, which can cause internal chemical burns if consumed!)
3. Quickly transfer the stone into your burn bowl.
4. Repeat steps 2-3 until your water begins to boil. Speed is key. If you do not repeat the process fast enough your water will not reach boiling point.
Golf-ball-sized stones have a surprising amount of thermal mass. They will boil your water for upwards of 10-15 minutes before they cool. Once the water stops boiling, you can add conifer needles to it to create a pleasant tasting tea that is rich in Vitamin C (this also masks the taste of wood, dirt and rocks).
Solar Still
This method of water purification has been touted in many survival books, but has more recently fallen under scrutiny for being inefficient. To create a solar still for survival water purification, dig a pit into the ground several feet deep. Place a container or cup into the bottom of the pit in the exact center. Then lay a clear piece of plastic over the entire pit and anchor the sides with rocks or logs.
Finally, place a small rock or weight in the center of the plastic (directly over the cup). When the sun heats up the whole apparatus, water evaporates out of the pit and becomes trapped as condensation on the inside of the plastic. The condensation then drips down into the cup as clean drinking water.
The problem with this method as a survival water purification technique is that it is a horrendously inefficient way to collect water. Even in ideal conditions an improvised solar still will generally only produce no more than eight fluid ounces of water a day. In a desert environment (which is where the solar still is often touted as being ideal) a human being needs, at minimum, around a gallon of water per day to stay healthy.
If you factor in the amount of effort and materials it would take to build even a single solar still in a survival situation, let alone enough stills to produce an adequate supply of water, you can see that it is not a very wise technique to employ.
Wrapping Up
Survival water purification is a life or death skill, and all survival skills should be practiced with caution and energy efficiency in mind. If you would like to learn more about survival water purification and go deeper into survival skills in general, check out our two day weekend survival course, our five day survival intensive course or our full ten-month wilderness certification program.
source : Jeremy Williams