


Survival Bread In a Dutch Oven
 “Hey folks, Backwoods Gourmet here, ready to show you another survival recipe. You can do it on an open fire, we’re probably going to do it on some all natural charcoal here today threatening rain it’s summertime Florid, rains every day. So it is real simple and a very few steps so will get it okay.”
“As I told you, this is about the most basic recipe you can make this is going to be for some survival bread and you only need a few things. You need a bowl, something to mix in and you need a couple teaspoons a salt. You need some warm water and some yeast or the mother of the bread that you used before, will explain that later. You need some cast iron cookware cause we’re gonna cook over coals. I like this big deep pan right here, gives it a lot of room for it to rise but if you don’t have that a 10 inch lodge skillet is good. We’re probably gonna try to do this one the dutch oven. These (skillets) only work if you’re doing it in a conventional oven okay because you need heat from the top. So if you wanna do this at home because this is really really great do at home also but you’re gonna need a Dutch oven, number 10 or number 12.”
“Just a few ingredients, its three cups of all-purpose flour or bread flour its whatever you got. Even if you’re some of my prepper friends out there subscribers um if you grind your own flour, whatever you have is gonna work. We’re gonna use about a teaspoon of salt that’s it. We’re going to take our dry yeast we’re gonna add that straight to the flour and here we have this is just warm tap water you didn’t have warm water obviously just heat it up a little bit.”
 “For water the optimal temperature is 105 degrees so it should feel warm to the touch. If you take it straight out of the tap it’s at 120 and will cool to 105 almost immediately so just warm tap water. And we’re just going to slowly add warm tap water into the flour and just try to get that incorporated and will keep adding it till we have the medium consistency dough. It’s not rocket science here okay. We just brought that together with just enough water to bring the flour and water yeast mixture together to where it’s reasonably smooth not like falling apart into different segments. It is consistent so that’s what you want at this step.”
“What we’re gonna do now is leave it in the bowl no fuss no muss we’re gonna put a dish towel over and we’re gonna set that Joker aside. If it’s cool where you live try to keep it in a warm place. Now if you’re camping near the fire optimal temperatures bout nineties to a 100 degrees. And a humidity level great. If you’re in a desert area you might want to just dampen the towel on top to keep the humidity level up inside the bowl so it doesn’t dry on the crust outside a bit. Here Florida summertime it’s already ninety percent humidity so all we’re gonna do is cover with a towel and this is the Saturday afternoon we’re gonna let that guy do its thing. Let that magic yeast do their thing until tomorrow.”
 “All right folks, next day on the bread here been sittin over there all night most of the day today couldn’t get back to it. It’s a nice airy gooey kinda because it’s risen up quite a bit the gluten in the flour just nice and stringy. This gonna give us a nice texture for the bread. Scrape that out on floured piece of wax paper and we’ll start working it a little bit. Roll it over on itself if it starts sticken you’re gonna have to get in there if ya don’t have all your paper covered but it’s now very soft, pliable and as soon as we work a little flour into it its gonna get stretchy like pizza dough. Work it back to the middle keep your hands floured very uh stretchy a soft. Paper helps contain the mess but definitely not necessary if you don’t have it. So now that I’ve got it kinda in a ball it’s starting to take shape keep my hands floured here and I’m just turning it back around itself and keep dustin it just enough to keep it from sticken to ya. Rollin it what I’m doing is on stretching it out stretching out the glutens. We’re gonna dust that off a little bit and keep it from sticking to us use a little more flour here. Just grabbin up new flour right now to feed this yeast and let it continue the rising process. So anyways got into a pretty nice ball there and what we’re gonna to next is move it over Dutch oven here. I did grease this with lard. I like to grease with lard its more a natural product has a higher burning rate than butter. And looking for kinda smooths surface on this guy right here and we gonna put it right in the middle.”
 “What we will do next for is take a very sharp knife and we’re gonna cut right through the top of the dough razor blade works really good for this too cut through the top that dough. Might have to put some flour on the knife cause this was particularly sticky. That’ll give it place to expand so what he needs now is more time till it at least doubled this volume.”
“It’s been about an hour we just had the Dutch oven sittin out here with the bread in the sun. We’ll can see it’s in pretty big is very close doubled so its time to get your fire ready. Maybe another fifteen minutes. So fire ready and we’ll bake her off. All right here we’ve got our backyard set up you know this is in lieu of campfire. We’ve got by volume we’re trying to hit 375 about the same as 9 coals, these are natural coals.  The rain did hold off for us so we were able to get her going. So we’re going to go ahead and get our pot on and take the rest of the chimney of home maders. We want more heat on top of tis obviously than on the bottom. So get a hold of this one down here that got away. We just kinda scoot those to the outside and we’ll keep rotating that lid.”
“Alright we got that set up now and most of our bottom coals around the bottom edge and the and the top coals around the top edge. We’ll come out here every 5-10 minutes and rotate that, actually every five minutes. Wanna look at about a 15-20 minute bake time to bake this bread. So we’ll just keep rotating that lid.”
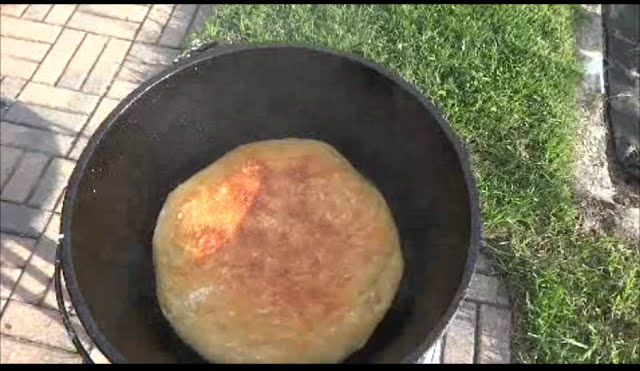
 “Ok we turned that lid one time there and like I said it’ll be short cooking time we are gonna go ahead and take a peak and look at it. That’s pretty much perfect. Golden brown bread so we are gonna go ahead and take that guy off the fire.”
“Alright we took him off and the first thing we do is pop him out of that pot. A very hot pot. The way I like to check the bread is thump it. If it sounds hollow that means it’s gonna be pretty good. So we will serve this guy up with some chicken and rice we made. We’ll show you how it looks once we slice it. I guarantee it taste awesome.”
“We are gonna go ahead and cut into this guy for ya. A bread knife works real good here. Gonna get a nice little wedge of it. Cut it out. You can see the bottom is just a little dark but not to bad. Gets nice and crispy on the bottom. It’s a hardy bread, it’s meant to be that way. Gonna go ahead and take some soften butter. If you’re looking up ahead at that its real butter to by the way, not margarine.  Give it a good slather of that and put that right there with the chicken and rice homemade and believe me, try this, you’re gonna love it.”
“Very warm day here in Florida in the back woods. I hope you guys enjoyed this video. Try this recipe yourself; it does take a while to perfect it. I’ve been trying myself for a couple of months now. Made it probably a dozen times. Like everything else it does take some practice. But it is something that is very simple, very few ingredients. You can make it in the woods, campin, whatever you wanna do with it.”