


Let’s begin with some hard facts: about 97% of our fresh water supply lays hidden beneath the Earth’s surface in underground aquifers and there are over fifteen million water wells in America.
People dig wells because a fresh and clean water supply is one of the most important things to have, especially in a survival situation. We’re basically made of water plus a few minerals and the fact that we can’t survive without water for more than a few days is common science.
All these things considered, learning how to dig a well is a good lesson that every prepper should master.
Even if it doesn’t come to a survival scenario, having your own water supply means that you’re basically off the grid. You’re not dependent upon third parties and that’s awesome in my book.
Most wells are about 200 feet deep and they’re usually made with specialized drilling equipment. But let’s not get ahead of ourselves.
When it comes to groundwater exploration, you must know that excess rainwater infiltrates the soil and tends to accumulate beneath the earth’s surface in aquifers, which are zones of water saturation. Hence, a well is simply a hole dug into the respective aquifer, from which a certain portion can be pumped out and used for irrigation, to water your livestock, domestic purposes and what not.
Types of Wells
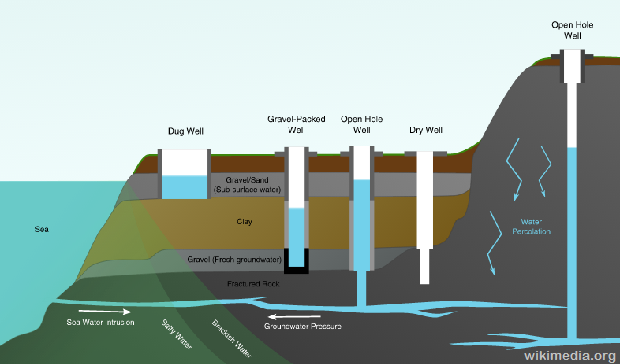
To begin with, there are basically three commonly used types of wells:
1. Dug wells
They are known by human kind for thousands of years and still around in lots of remote locations. You probably know what these are – those old school wells protected by tiny roofs, sporting a bucket hanging from a crank. That’s a dug well. You can dig a well using elbow grease and shovels (the hard way) or with specialized drilling equipment, such as power tools (hello 21st century!). Either way, these wells are generally shallow and not very expensive to drill.
For best results, dug wells must be lined on the top part. This is referred to as casing of the hole. You simply line the top of the well with impermeable materials (usually bricks, stone masonry or concrete) to keep surface water from infiltrating/contaminating the well.
The casing also prevents the hole from caving in in some types of rock formations. Dug wells work on a basic principle: find an aquifer close to the surface of the Earth and dig a hole below the water level, allowing the water to fill the bottom of the hole and voila, you got yourself a water source!
2. Drilled Wells
Drilled wells are the most common nowadays and they’re basically deep, narrow shafts drilled into the ground using a machine or even manual drilling equipment.
Drilled wells can go very deep into the ground – up to 3,000 feet or so – and at ground level all you can see is the end of the pipe sticking out. This type of well usually sucks water from more than one aquifer and when you’re drilling, the rule of thumb is to ignore the first aquifer that you hit and go for the deeper ones, with better flow and purer water.
3. Driven Wells
As the name suggests, driven wells consist of a special perforated pipe that is pounded into the ground until it reaches an aquifer. They are not commonly used, but they’re not unheard of either.
Driven wells are an option when the top aquifer is shallow and they come with the obvious advantage of not requiring a casing, unlike dug wells.
Things to Meditate Upon before Starting Your Well Endeavor
There are three important steps or procedures to follow for optimum results in well-digging: siting, drilling and testing the well.
Siting refers to the process of groundwater exploration itself, which should be as scientific as possible.
Basically, any hole dug deep enough in the ground will provide you with some water, at least at the beginning, but the amount of water resulting from a randomly dug hole can be insufficient.
Low-yield wells may be enough for drinking, but if you dig a well for irrigation purposes, that’s another matter. There are scientific methods for finding the best spots for high-yield wells and generally speaking, high-yield wells are those that penetrate a fractured rock zone.
The procedure for finding the fracture spots can be expensive, but anyway, it would be a good idea to confer with an expert about the availability and also reliability of local aquifers before starting investing in drilling or digging equipment.
A good start would be to consult with your local state geological survey office about the potential sweet spots on your property, i.e. if you have suitable conditions for building a well on your land.
The first step in digging yourself a well is to find the optimal location, the “sweet spot” as drillers say.
The respective spot should be away from buried fuel tanks (at least 50 feet away), septic systems (the same), pastures (100 feet away), barnyards, cesspools, basically anything that has the potential of polluting the aquifer (and at least 5 feet away from building sites). You should avoid digging wells where the groundwater appears within ten feet of the Earth’s surface as well.
You should also check with your local building department because depending on your location, you may require a building permit and also you must meet certain construction standards. It’s a good idea to contact your utility company too to make sure that you don’t start digging holes on top of gas pipes and the like.
A pretty straightforward indicator of a shallow aquifer is that spot on your property that has green grass during the driest part of the year.
After you find the proper location, go dig a test well in the “sweet spot”. See how deep you must go to hit water and try to measure the fill rate. Depending on your water needs and the fill rate, you’ll decide if you’ll dig the well in the respective location or not.
Also, you should determine what water system equipment you require for providing you with a reliable supply of water from the well.
By water system, I mean the following: pumps, filters and tubing, along with a tank or cistern for water storage. All these must be calculated to meet your specific demands. Also, you must test the quality of the water before starting digging, as it may be polluted or contaminated with chemicals, sediment, bacteria or other yuck.
It is very important to properly determine the yield of your well and its flow-rate; if you install a water pump with a pumping rate that exceeds the flow rate and yield of the respective well, the pump will run dry and it will get damaged or wear out quickly.
Choosing the most appropriate construction method is the next step. Keep in mind that using a specialized contractor could turn up to be the best solution both in terms of efficiency and time saving but also it will help a lot with the paperwork I’ve mentioned above.
Since most wells are drilled, not dug or driven, the prices for drilled wells are pretty affordable considering the results and they might come with lots of benefits.
If you’ve already decided to DIY, check out the video below (there are 5 episodes) about how to dig your own well using standard equipment easily available at Home Depot and the like, thus saving money in the process.
Video first seen Nelson Studios
After the well was dug or drilled and casing is installed, as final preparation you should pump it dry a couple of times and let it refill. This way you’ll get all the impurities resulting from the drilling process out. The procedure is called surge pumping or developing the well. A properly developed well will have better yield long-term and purer water.
Also, remember about dug well safety, i.e. building a brick wall around your well to prevent accidents and improve sanitation. Children or animals may fall into the well and the surrounding wall prevents surface run-off from getting inside.

Having your own well on your property is a good idea even if you just want fresh, clean water that isn’t full of fluoride and chlorine like city water is. If SHTF, you’ll have one major problem already solved.
If you’ve ever dug your own well and have any pointers, we’d love to hear them in the comments section below.
This article has been written by Chris Black for Survivopedia.
About Chris Black
Chris Black is a born and bred survivalist. He used to work as a contractor for an intelligence service but now he is retired and living off the grid, as humanly possible. An internet addict and a gun enthusiast, a libertarian with a soft spot for the bill of rights and the Constitution, a free market idealist, he doesn’t seem very well adjusted for the modern world. You can send Chris a message at chris.black [at] survivopedia.com.